How to implement DotNET Core OAuth2 for an API
This article will look into how to implement dotnet core OAuth2 for a Web API. The example API we will create in this tutorial will have options to register a new user and provide options to log in and log out. For authorization, we will implement the OAuth2 standard protocol.
Enjoy the tutorial and at the end please let me know if you liked it.
What is OAuth2?
OAuth 2.0 is the industry-standard protocol for authorization. OAuth 2.0 focuses on client developer simplicity. It provides specific authorization flows for different applications.
OAuth2 stands for “Open Authorization”. Is a standard designed to allow a website or application to access resources hosted by other web apps on behalf of a user. It replaced OAuth 1.0 in 2012 and is now the de facto industry standard for online authorization. OAuth 2.0 provides consented access and restricts actions of what the client app can perform on resources on behalf of the user, without ever sharing the user’s credentials.
OAuth 2.0 uses Access Tokens. An Access Token is a piece of data that represents the authorization to access resources on behalf of the end user. For better security, the access tokens should have short lifetimes. In order to get a new access token based on an expired token, we introduce a refresh token mechanism.
An OAuth Refresh Token is a string that the OAuth client can use to get a new access token without the user’s interaction. A refresh token must not allow the client to gain any access beyond the scope of the original grant. The refresh token exists to enable authorization servers to use short lifetimes for access tokens without needing to involve the user when the token expires.
What we want to achieve in this article looks like this:
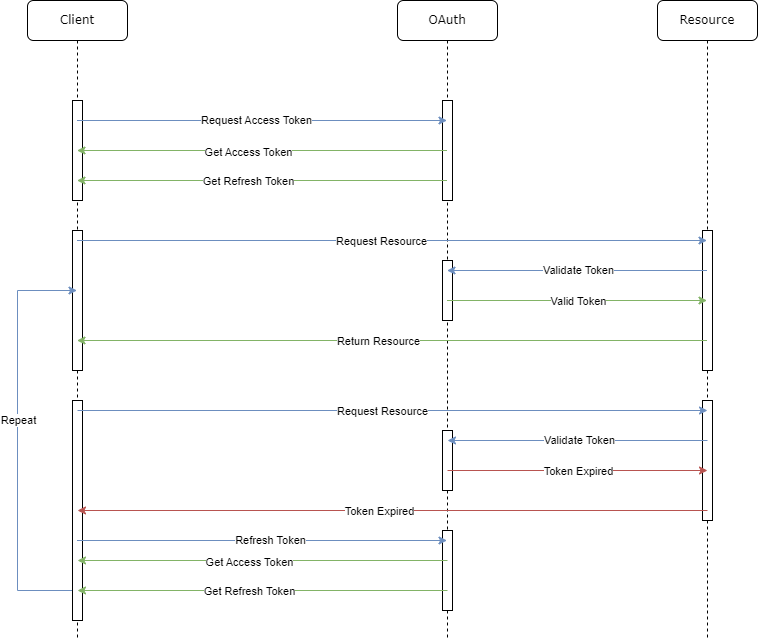
DotNet Core OAuth2 Web API
To prove how OAuth2 will work with .NET Core, we will create a .NET Core Web API. The API will have four endpoints: register, authenticate, refresh token, log out, and log out everywhere. This is a diagram of what we want to achieve:
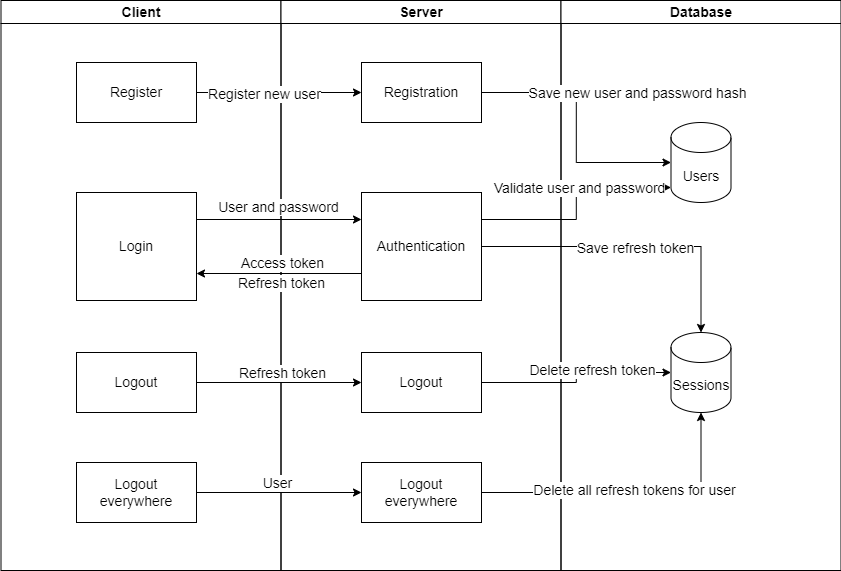
I chose to use layered architecture for designing the Web API. This is the project structure:
- IdentityMicroservice – top layer, main entry point to our application. This is where we will have the controller that will handle the authentication and .NET Core Web API-specific files.
- IdentityMicroservice.BusinessLogic – business rules layer. We will use this for doing different checks and operations before sending data back to the top layer.
- IdentityMicroservice.DataAccess – used for defining database entities and database interaction.
- IdentityMicroservice.Database – placeholder for database creation scripts.
- IdentityMicroservice.DI – handles dependency injection. I chose to move DI to a different project instead of having everything in Program.cs. This way the code is much clearer and is easier to create integration tests.
- IdentityMicroservice.Domain – used to define the models we will use in the application. Layers will communicate with each other using domain entities instead of database entities.
- IdentityMicroservice.Repositories – used to communicate between the application and the database. Here is where we will map domain entities to data access entities and save data to our database.
- IdentityMicroservice.Services – layer that will handle different services used in the application. In this layer, we will have a service that will help us with hashing and validating the password. Also, we will have a service that will help us with generating access tokens, refresh tokens, and extract data from the access tokens.
Register new users
The registration of new users will be straightforward and will create a new record in our database users table. We will keep the controller as simple as possible and only have a call to our business logic layer.
        [AllowAnonymous]
        [HttpPost("register")]
        public async Task<IActionResult> Register([FromBody] RegisterUser registerUser)
        {
            return new ObjectResult(await authBusinessLogic.ProcessRegisterUser(registerUser));
        }
As seen above, we have decorated the post method with AllowAnonymous. This is because we don’t need an authenticated user when he is registering in the application.
In the business layer, we will check if the username or the email already exists in the database. We hash the password and call the repository for saving to the database.
public async Task<User> ProcessRegisterUser(RegisterUser registerUser)
        {
            if (registerUser == null)
            {
                throw new ArgumentNullException(nameof(registerUser));
            }
            if (await usersRepository.UsernameExists(registerUser.Username))
            {
                throw new ApplicationException($"Username {registerUser.Username} is already used!");
            }
            if (await usersRepository.EmailExists(registerUser.Email))
            {
                throw new ApplicationException($"Email {registerUser.Email} is already used!");
            }
            return await usersRepository.Add(GetUserFromRegisterUser(registerUser));
        }
...
private User GetUserFromRegisterUser(RegisterUser registerUser)
        {
            return new User
            {
                UserId = Guid.NewGuid(),
                Username = registerUser.Username,
                Email = registerUser.Email,
                PasswordHash = cryptoService.GetPasswordHash(registerUser.Password)
            };
        }
ProcessRegisterUser hides the password before returning the created user.
Authenticate
In this part, we are allowing the user to authenticate using the username or email address and the password. Controller:
[AllowAnonymous]
        [HttpPost("authenticate")]
        public async Task<IActionResult> Authenticate([FromBody] LoginCredentials loginCredentials)
        {
            return new ObjectResult(await authBusinessLogic.ProcessAuthenticate(loginCredentials));
        }
Once again we are using data annotation AllowAnonymous to allow users to authenticate without the need for an access token.
In the business layer, we will check if we have a user with the provided username or password. Also, we validate the password, generate a new access token, and refresh token. We keep the refresh token will in the database user sessions table. This table will serve in storing user refresh tokens. The table also contains an IP Address field that can help track the user’s sessions along multiple devices.
public async Task<User> ProcessAuthenticate(LoginCredentials loginCredentials)
        {
            if (loginCredentials == null)
            {
                throw new ArgumentNullException(nameof(loginCredentials));
            }
            User user = null;
            if (await usersRepository.UsernameExists(loginCredentials.Username))
            {
                user = await usersRepository.GetByUsernameWithPassword(loginCredentials.Username);
            }
            else if (await usersRepository.EmailExists(loginCredentials.Username))
            {
                user = await usersRepository.GetByEmailWithPassword(loginCredentials.Username);
            }
            if (user == null || !cryptoService.VerifyPasswordHash(user.PasswordHash, loginCredentials.Password))
            {
                throw new ApplicationException("Incorrect username/email or password!");
            }
            user.PasswordHash = null;
            var usersClaims = new[]
            {
                new Claim(ClaimTypes.Name, user.Username),
                new Claim(ClaimTypes.NameIdentifier, user.UserId.ToString())
            };
            user.Token = tokenService.GenerateAccessToken(usersClaims);
            user.RefreshToken = tokenService.GenerateRefreshToken();
            await userSessionsRepository.DeleteExpiredByUserId(user.UserId);
            await userSessionsRepository.Add(GetUserSession(user.UserId, user.RefreshToken, loginCredentials.IpAddress));
            return user;
        }
Before adding a new refresh token to the user sessions table I also chose to have an extra step that cleans all expired refresh tokens. One improvement here would be to limit the login attempts based on the IP Address.
Refresh Token
When the user attempts to access an API endpoint with an expired access token, the API returns 401 unauthorized, and token expired in the header of the response. To get a new access token, we have an endpoint for refreshing the token. It receives the expired access token, and the refresh token and returns a new access token and a new refresh token. Controller:
[AllowAnonymous]
        [HttpPost("refreshToken")]
        public async Task<IActionResult> RefreshToken([FromBody] TokenModel tokenModel)
        {
            return new ObjectResult(await authBusinessLogic.ProcessRefreshToken(tokenModel));
        }
In the business layer, we get the user from the expired access token. Then we check if the refresh token is valid (exists in the user sessions table and is not expired). Then we generate a new access token, and a new refresh token, save the new refresh token in the database, and return the new access token and refresh token.
Logout
We use logout for logging out the user. Having in mind we are allowing the user to log in from many devices, the logout splits into two options. One for logging out from one device and one option for logging out from all devices.
[HttpPost("logout")]
        public async Task<IActionResult> Logout([FromBody] string refreshToken)
        {
            await authBusinessLogic.ProcessLogout(refreshToken, GetUserIdFromRequest());
            return Ok();
        }
        [HttpPost("logout-everywhere")]
        public async Task<IActionResult> LogoutEverywhere()
        {
            await authBusinessLogic.ProcessLogoutEverywhere(GetUserIdFromRequest());
            return Ok();
        }
In the business logic, for the log-out operation, we are deleting the session based on the refresh token and user. When we are logging out everywhere, we delete all the refresh tokens for the authenticated user from the user sessions table.
public async Task ProcessLogout(string refreshToken, Guid userId)
        {
            await userSessionsRepository.DeleteByRefreshTokenAndUser(refreshToken, userId);
        }
        public async Task ProcessLogoutEverywhere(Guid userId)
        {
            await userSessionsRepository.DeleteByUserId(userId);
        }
OAuth2 Authorization
Both logout and logout-everywhere need an authorized user. The AuthController has the Authorize annotation. This means that all methods from this controller need authorization, except the ones that allow anonymous access.
I isolated the authorization in the DI project:
public static void AddAuthentication(IServiceCollection services, IConfiguration configuration)
        {
            services.AddAuthentication(options =>
            {
                options.DefaultScheme = "bearer";
            }).AddJwtBearer("bearer", options =>
            {
                options.TokenValidationParameters = new TokenValidationParameters
                {
                    ValidateAudience = false,
                    ValidateIssuer = false,
                    ValidateIssuerSigningKey = true,
                    IssuerSigningKey = new SymmetricSecurityKey(Encoding.UTF8.GetBytes(configuration.GetSection("Authentication:Token:ServerSigningPassword").Get<string>())),
                    ValidateLifetime = true,
                    ClockSkew = TimeSpan.Zero
                };
                options.Events = new JwtBearerEvents
                {
                    OnAuthenticationFailed = context =>
                    {
                        if (context.Exception.GetType() == typeof(SecurityTokenExpiredException))
                        {
                            context.Response.StatusCode = 401;
                            context.Response.Headers.Add("Token-Expired", "true");
                        }
                        return Task.CompletedTask;
                    }
                };
            });
        }
When we call any endpoint, the code from above validates the requester. It is validating every call to our API on every method/controller that has the Authorize annotation. I won’t go deeper into the TokenService. Here is where we create the access token and refresh token. You can check the source code on GitHub https://github.com/relaxedcodercom/IdentityMicroservice . If you have any questions or you would like to have more details about my implementation of OAuth2 into .NET Core please leave a comment below.
Subscribe to my newsletter
Subscribe to Relaxed Coder and be up to date with the latest articles.

No comments yet.