How to use Google reCAPTCHA v2 with .NET Core
In an era of increasing online threats, web developers must implement robust security measures to protect their applications. Google reCAPTCHA v2 offers a powerful solution for preventing automated bots from accessing websites. This article explores how to integrate reCAPTCHA v2 into your .NET Core applications, ensuring a safer and more reliable user experience.
Let’s learn how to implement Google reCAPTCHA v2 to a .NET Core Web API. We will use the .NET Core Identity Microservice and Angular Identity project we created a while ago. You can read my previous articles to get up to speed:
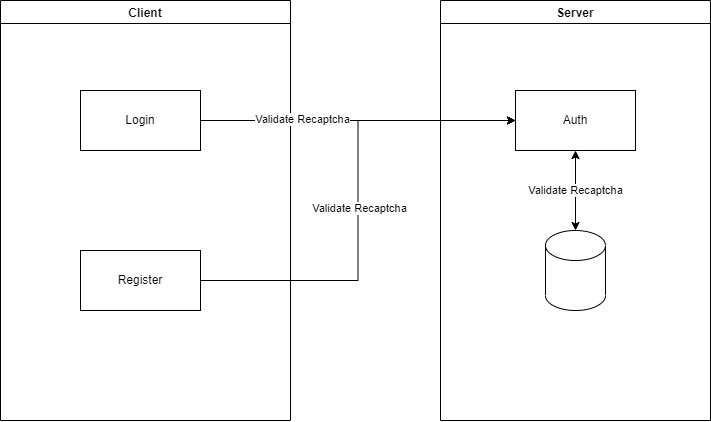
This is what we want to achieve in this article:
What is reCAPTCHA?
reCAPTCHA is a free service that protects your website from spam and abuse. reCAPTCHA uses an advanced risk analysis engine and adaptive CAPTCHAs to keep automated software from engaging in abusive activities on your site. It does this while letting your valid users pass through with ease.
reCAPTCHA offers more than just spam protection. Every time our CAPTCHAs are solved, that human effort helps digitize text, annotate images, and build machine-learning datasets. This in turn helps preserve books, improve maps, and solve hard AI problems.
Configure Google reCAPTCHA
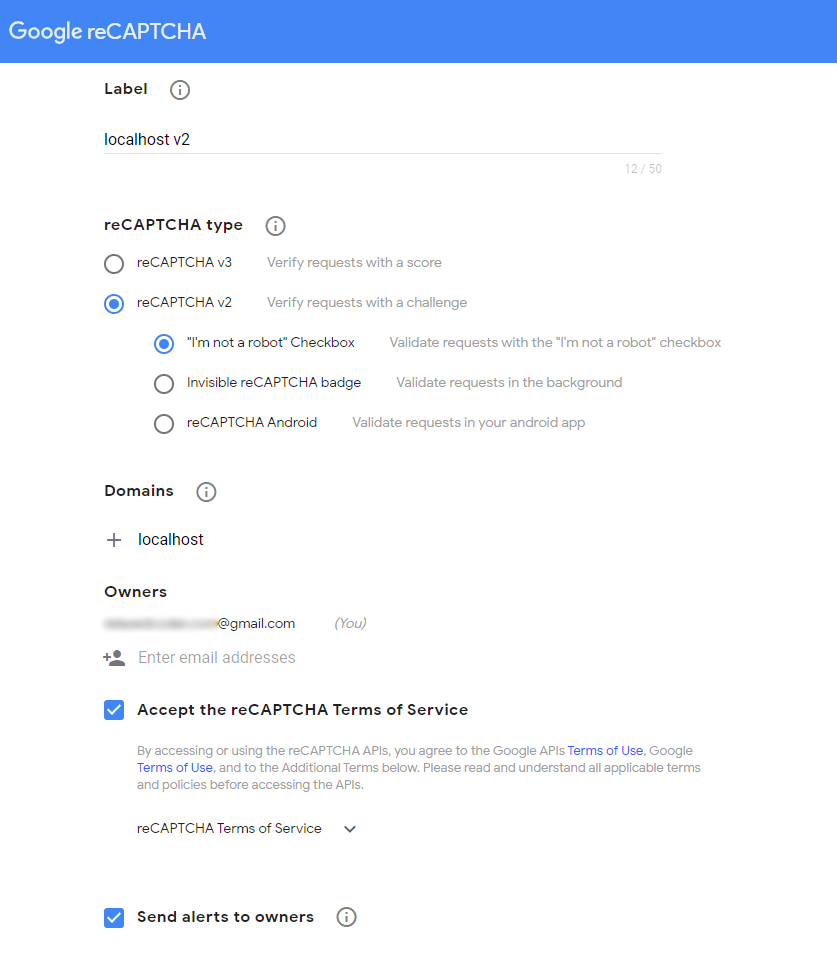
Before going into the code, we need to configure Google reCAPTCHA. For this, you need to have a Gmail Account and then go to https://google.com/recaptcha/admin/create . Here you will need to register a new website. Before you deploy to production, most likely you will need to use reCAPTCHA via localhost. Here is how I configured it for localhost:
After you click submit, Google provides you with a site key and a secret key.
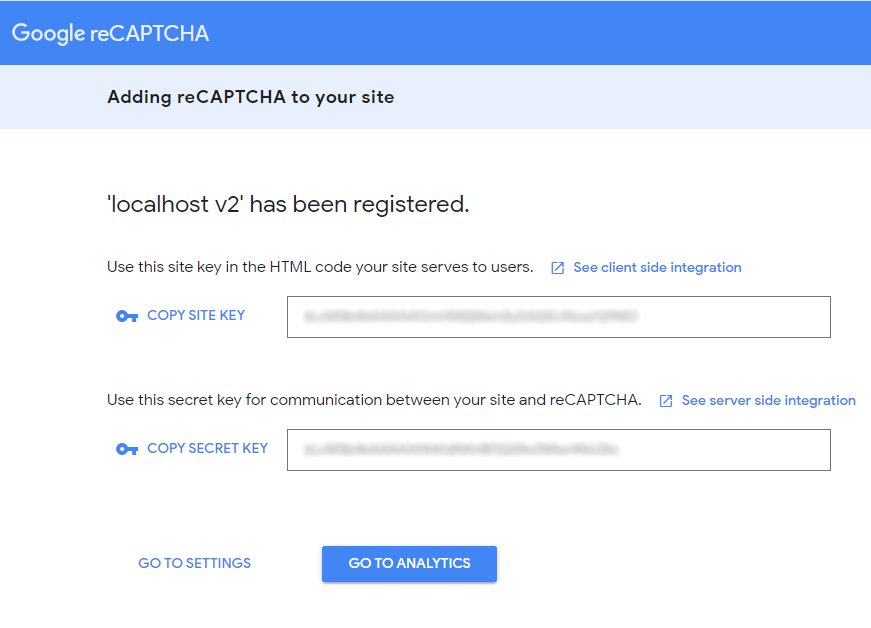
We will need both keys to make reCAPTHA function properly. The UI part (in our case Angular) needs the site key and the backend (.NET Core) needs the secret key.
If you skipped saving the keys you can always get them back from the reCAPTCHA settings section.
Google reCAPTCHA with .NET Core Web API
When the user validates the reCAPTCHA from the UI, the component provides a token. We will validate that token towards Google reCAPTCHA API.
We will start by creating a new service that will validate the token received by the user. This service will make a web request to Google reCAPTCHA API and validate if the token is valid or not.
public class RecaptchaV2Service : IRecaptchaV2Service
    {
        private readonly IConfiguration configuration;
        private readonly IHttpClientFactory httpClientFactory;
        public RecaptchaV2Service(IConfiguration configuration, IHttpClientFactory httpClientFactory)
        {
            this.configuration = configuration;
            this.httpClientFactory = httpClientFactory;
        }
        public async Task<bool> ValidateReCaptchaResponse(string response)
        {
            var httpRequestMessage = new HttpRequestMessage(
            HttpMethod.Get,
            string.Format(configuration.GetSection("Authentication:ReCaptcha:v2:Url").Get<string>(),
                configuration.GetSection("Authentication:ReCaptcha:v2:PrivateKey").Get<string>(), response));
            var httpClient = httpClientFactory.CreateClient();
            try
            {
                var httpResponseMessage = await httpClient.SendAsync(httpRequestMessage);
                if (httpResponseMessage.IsSuccessStatusCode)
                {
                    using var contentStream = await httpResponseMessage.Content.ReadAsStreamAsync();
                    using (var readStream = new StreamReader(contentStream))
                    {
                        var jsonResponse = readStream.ReadToEnd();
                        var data = JsonConvert.DeserializeObject<RecaptchaResponse>(jsonResponse);
                        return data.Success;
                    }
                }
                return false;
            }
            catch (WebException)
            {
                return false;
            }
        }
    }
    public class RecaptchaResponse
    {
        public bool Success { get; set; }
    }
When the user logs in or when a new user is registering, our .NET Core Web API will also validate the reCAPTCHA token. Let’s take login as an example. The user adds the username and the password, validates reCAPTCHA, and clicks on login. This will do a POST to our Web API with the credentials and with the reCAPTCHA token. On the server side, we call our newly created service with the token we received from the client side.
if (!await recaptchaV2Service.ValidateReCaptchaResponse(loginCredentials.Recaptcha))
            {
                throw new ApplicationException("Please validate ReCaptcha!");
            }
Google reCAPTCHA with Angular
On the server side, we managed to check the token without needing to use any external package. We can implement something similar with Angular as well but is way easier to use a library that will help us with reCAPTCHA. I chose to use ng-recaptcha .
Here are the steps I followed when implementing ng-recaptcha:
- Install ng-recaptcha:
npm i ng-recaptcha --save- Import modules RecaptchaModule and RecaptchaFormsModule
- Update the form fields with a field for reCAPTCHA needed
private initializeForm() {
    this.form = this.fb.group({
      username: ['', [Validators.required]],
      password: ['', [Validators.required]],
      recaptcha: ['', [Validators.required]]
    });
}- Read the reCAPTCHA site key from the environment
public recaptchaSiteKey = environment.recaptchaSiteKey;- Declare a variable for the default theme. We can change this when the user switches from a light theme to a dark theme.
public theme: ReCaptchaV2.Theme = 'light';- Add the HTML code for the reCAPTCHA field
<re-captcha #captchaElem [siteKey]="recaptchaSiteKey" formControlName="recaptcha" [theme]="theme"></re-captcha>
        <mat-error *ngIf="form.controls['recaptcha'].invalid && form.controls['recaptcha'].touched">
Please validate recaptcha!</mat-error>- Performs a manual captcha reset. This method is useful when the user tries to log in and for some reason, it fails. The user then needs to validate the reCAPTCHA again.
@ViewChild('captchaElem', { static: false }) captchaElem: RecaptchaComponent;
…
error: () => {
            this.captchaElem.reset();
            this.form.controls['recaptcha'].markAsUntouched();
          }
This is how the login component looks like with Google reCAPTCHA v2 implemented:
import { FormBuilder, FormGroup, Validators } from '@angular/forms';
import { Component, OnInit, ViewChild } from '@angular/core';
import { ActivatedRoute, Router } from '@angular/router';
import { AuthenticationService, IpService, UserPersistenceService } from '@core/services';
import { LoginCredentials, User } from '@core/models';
import { environment } from '@environments/environment';
import { RecaptchaComponent } from 'ng-recaptcha';

@Component({
  selector: 'app-login',
  templateUrl: './login.component.html',
  styleUrls: ['./login.component.scss']
})
export class LoginComponent implements OnInit {
  public form: FormGroup;
  public recaptchaSiteKey = environment.recaptchaSiteKey;
  public theme: ReCaptchaV2.Theme = 'light';
  private returnUrl: string;
  private ipAddress: string;
  @ViewChild('captchaElem', { static: false }) captchaElem: RecaptchaComponent;

  constructor(private route: ActivatedRoute, private fb: FormBuilder,
    private authenticationService: AuthenticationService, private router: Router,
    private userPersistenceService: UserPersistenceService, private ipService: IpService) {
    this.initializeForm();
    this.setIpAddress();
  }

  private setIpAddress() {
    this.ipService.getIPAddress().subscribe((result: any) => {
      this.ipAddress = result.ip;
    })
  }

  private initializeForm() {
    this.form = this.fb.group({
      username: ['', [Validators.required]],
      password: ['', [Validators.required]],
      recaptcha: ['', [Validators.required]]
    });
  }

  ngOnInit() {
    this.returnUrl = this.route.snapshot.queryParams['returnUrl'] || '/';
  }

  login() {
    if (this.form.invalid) {
      return;
    }

    var loginCredentials = new LoginCredentials();
    loginCredentials = {
      ...loginCredentials,
      ...this.form.value,
    };
    loginCredentials.ipAddress = this.ipAddress;

    this.authenticationService
      .login(loginCredentials)
      .subscribe(
        {
          next: (user: User) => {
            user.ipAddress = this.ipAddress;
            this.userPersistenceService.setUser(user);
            this.router.navigate([this.returnUrl]);
          },
          error: () => {
            this.captchaElem.reset();
            this.form.controls['recaptcha'].markAsUntouched();
          }
        }
      );
  }
}
Resources
- How To Implement DotNET Core OAuth2 For An API
- Creating An Angular Login With The Latest Version
- Identity Microservice source code: https://github.com/relaxedcodercom/IdentityMicroservice
- Angular Identity source code: https://github.com/relaxedcodercom/AngularIdentity
Subscribe to my newsletter
Subscribe to Relaxed Coder and be up to date with the latest articles.
Conclusions
We learned how to implement Google reCAPTCHA v2 to a .NET Core Web API together with an Angular App. Please use the comments section below if you have any questions. If you liked this article please don’t hesitate to share it with your friends.

No comments yet.