How to create a C# .NET Core Web API
Let’s have a look together at creating a .net core Web API application using .NET 6, MySQL, and Visual Studio Code. If you haven’t installed Visual Studio Code yet, you can find a tutorial here. In this article, I will show you how to create a .net 6 Web API. We will try to structure the project using layered architecture, use SOLID principles, and clean code. For our example, let’s create a .NET Core Web API that will manage books.
Project structure
I mentioned above that we will use a layered architecture and for each layer of our .NET Core Web API application we will use a separate project. This is what we want to achieve with our project structure.
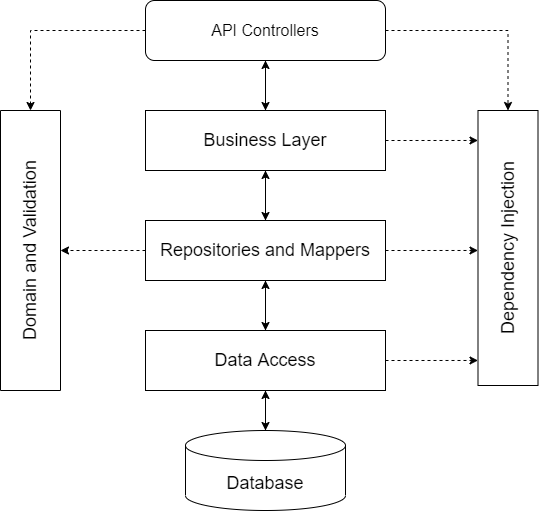
Creating multiple projects for our .NET Web API helps us organize the application better. You will notice that some of the projects we are about to add to our application are actual layers/components in the diagram above.
Before going into the creation of the projects we will need a solution file where we can have the references for our projects. Open the terminal window from the folder where you will have your .NET Core Web API. In my case, I named the API DigitalLibraryAPI. Here are the terminal commands for creating the solution structure:
- The first of our projects will be the .NET Core Web API project.
// from the project root
// create the solution file
dotnet new sln -n DigitalLibraryAPI
// create new .net 6 Web API
dotnet new webapi -o DigitalLibraryAPI.Web
// add web API project reference to the solution file
dotnet sln add DigitalLibraryAPI.Web/DigitalLibraryAPI.Web.csproj- The second project will be a class library that we will use for connecting to the database.
// create new class library project for data access
dotnet new classlib -o DigitalLibraryAPI.DataAccess
// add Data Access project reference to the solution file
dotnet sln add DigitalLibraryAPI.DataAccess/DigitalLibraryAPI.DataAccess.csproj- The third project will be also a class library and we will use it for CRUD operations on our database.
// create new class library project for repositories
dotnet new classlib -o DigitalLibraryAPI.Repositories
// add Repositories project reference to the solution file
dotnet sln add DigitalLibraryAPI.Repositories/DigitalLibraryAPI.Repositories.csproj- The fourth project will be a class library for managing our models.
// create new class library project for domain
dotnet new classlib -o DigitalLibraryAPI.Domain
// add Domain project reference to the solution file
dotnet sln add DigitalLibraryAPI.Domain/DigitalLibraryAPI.Domain.csproj
This is all we need for now. If we find out along the way that we will need more projects for our solution we can add them later.
Running the .NET Core Web API application
When we executed the dotnet command for the Web API project, the command creates a controller for us, so we can go ahead and see if it runs. From the terminal, change the directory to the API project.
cd DigitalLibraryAPI.WebThen run the application.
dotnet runYou should see something like this
Building...
info: Microsoft.Hosting.Lifetime[14]
Now listening on: https://localhost:7257
info: Microsoft.Hosting.Lifetime[14]
Now listening on: http://localhost:5207
info: Microsoft.Hosting.Lifetime[0]
Application started. Press Ctrl+C to shut down.
info: Microsoft.Hosting.Lifetime[0]
Hosting environment: Development
info: Microsoft.Hosting.Lifetime[0]
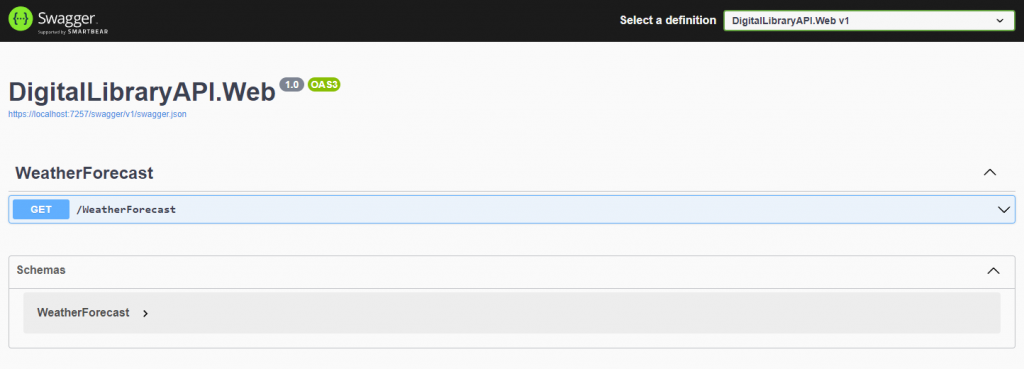
Content root path: D:\Blog\DigitalLibraryAPI\DigitalLibraryAPI.Web\The dotnet command configured Swagger for our API project ( DigitalLibraryAPI.Web/Program.cs). If for some reason, the NuGet package was not installed during the creation of the project, you can install it yourself. Use the following command to install the latest Swagger package for .NET Core:
dotnet add DigitalLibraryAPI.Web.csproj package Swashbuckle.AspNetCoreGet the HTTPS URL provided in the terminal and open a new window in your browser. You should see something like this:
Models and Data Access
We have the project structure setup, let’s continue by creating the models we will use across our application. Our library application will work with books, so this will be our main entity.
Having in mind we are creating our Book entity under the Domain project, we will need to place the class under a specific namespace. This will allow us to reference it later a lot easier and safer.
namespace DigitalLibraryAPI.Domain.Entities
{
    public class Book
    {
        public Guid BookId { get; set; }
        public string Title { get; set; }
        public string Author { get; set; }
        public string Description { get; set; }
    }
}
Let’s switch to Data Access project. Here we are configuring the interaction with our database. For our example, we will use a MySQL database. In the terminal, use the following three commands to add packages to the Data Access project:
dotnet add package Pomelo.EntityFrameworkCore.MySql
dotnet add package Microsoft.EntityFrameworkCore
dotnet add package Microsoft.EntityFrameworkCore.Design
We will add the C# class representation of our table for the books. The name of the columns in the table should correspond with the name of the properties in our Book class. The Book class from Data Access will look similar to the one in the Domain project. Why do we have the same class (model) twice? We will get back to this and when you get the whole picture you will understand.
When we will add a new book to our database, it will be a good idea to validate the data before inserting or updating it. For this, we can have our data validators in the Domain project. FluentValidation is a good package that can help us achieve this.
dotnet add package FluentValidationAnd this is our BookValidator class.
using DigitalLibraryAPI.Domain.Entities;
using FluentValidation;
namespace DigitalLibraryAPI.Domain
{
    public class BookValidator : AbstractValidator<Book>
    {
        public BookValidator()
        {
            RuleFor(b => b.Title)
            .NotEmpty()
            .Length(1, 200);
            RuleFor(b => b.Author)
            .Length(0, 200);
        }
    }
}
Before we will do an Insert or Update to our database we will want to validate the Book entity. We will need a method that will allow us to do this. Then let’s extend our Book class with a method for validation.
using DigitalLibraryAPI.Domain.Validators;
using FluentValidation;
namespace DigitalLibraryAPI.Domain.Entities
{
    public class Book
    {
        private static readonly BookValidator bookValidator = new();
        // ...
        public void ValidateAndThrow()
        {
            bookValidator.ValidateAndThrow(this);
        }
    }
}
You can notice that I have declared the bookValidator field as static. This is because we don’t want a new validator instance for each of our book objects. Declaring the validator as static will give us better performance in the program execution.
It’s time to declare the DataContext class. This class will inherit from the Entity Framework DbContext class. DbContext is the primary class that is responsible for interacting with the database.
using Microsoft.EntityFrameworkCore;
namespace DigitalLibraryAPI.DataAccess
{
    public class MySqlDataContext : DbContext
    {
        public MySqlDataContext(DbContextOptions<MySqlDataContext> options) : base(options) { }
        public DbSet<Book> Books { get; set; }
        protected override void OnModelCreating(ModelBuilder modelBuilder)
        {
            modelBuilder.Entity<Book>().ToTable("Books");
        }
    }
}
Repositories and Mappers
In the repositories project we will have our CRUD operations and also our mappers. The mappers will take care of mapping DataAccess entities to Domain entities.
I mentioned before that I will get back to why we have what looks like the same model in two places. We reference the models from the DataAccess project to map the data from the SQL database to actual objects in C#. We use the objects from DataAccess project for this purpose only.
From our repository classes, we will return only Domain entities. We want to hide as many details as possible about the database tables. Using the domain entities will help us achieve this. For this API I chose to use MySql as the database provider. If we want to change the database from MySql to MSSQL or to NoSQL, we will only do changes in the DataAccess project and in the Repositories project. The entities that we use to connect to the database tables or collections might change. Our repository will always receive and return Domain entities.
From the Repositories project, we will need references to the Domain and DataAccess projects in order to use the two models. These commands in the terminal window will help us achieve this:
dotnet add reference ../DigitalLibraryAPI.Domain/DigitalLibraryAPI.Domain.csproj
dotnet add reference ../DigitalLibraryAPI.DataAccess/DigitalLibraryAPI.DataAccess.csproj
Mappers
using DigitalLibraryAPI.Domain.Entities;
using DigitalLibraryAPI.Repositories.Contracts.Mappers;
namespace DigitalLibraryAPI.Repositories.Mappers
{
    public class BookMapper : IBookMapper
    {
        public Book GetFromDataAccess(DataAccess.Book book)
        {
            if (book == null)
            {
                throw new ArgumentNullException(nameof(book));
            }
            return new Book
            {
                BookId = book.BookId,
                Title = book.Title,
                Author = book.Author,
                Description = book.Description
            };
        }
        public DataAccess.Book GetFromDomain(Book book)
        {
            if (book == null)
            {
                throw new ArgumentNullException(nameof(book));
            }
            return new DataAccess.Book
            {
                BookId = Guid.NewGuid(),
                Title = book.Title,
                Author = book.Author,
                Description = book.Description
            };
        }
        public void Update(DataAccess.Book dataAccessBook, Book book)
        {
            if (dataAccessBook == null)
            {
                throw new ArgumentNullException(nameof(dataAccessBook));
            }
            if (book == null)
            {
                throw new ArgumentNullException(nameof(book));
            }
            dataAccessBook.Title = book.Title;
            dataAccessBook.Author = book.Author;
            dataAccessBook.Description = book.Description;
        }
    }
}
Our book mapper will offer us the options to map book from DataAccess to Domain and the other way around. Besides this, we also have a method that is doing the update part from the CRUD operations. There are some pre-built libraries for mapping from one object to another. One of them is the Automapper but, for better performance, I recommend doing the mapping manually.
Repositories
The repository is responsible for the CRUD operations towards our database. Our BooksRepository will use LINQ and lambda expressions to interact with the database. You can find out more about C# LINQ and C# lambda expressions here .
using DigitalLibraryAPI.DataAccess;
using DigitalLibraryAPI.Repositories.Contracts;
using DigitalLibraryAPI.Repositories.Contracts.Mappers;
using Microsoft.EntityFrameworkCore;
using Book = DigitalLibraryAPI.Domain.Entities.Book;
namespace DigitalLibraryAPI.Repositories
{
    public class BooksRepository : IBooksRepository
    {
        private readonly MySqlDataContext dataContext;
        private readonly IBookMapper bookMapper;
        public BooksRepository(MySqlDataContext dataContext, IBookMapper bookMapper)
        {
            this.dataContext = dataContext;
            this.bookMapper = bookMapper;
        }
        public async Task<IList<Book>> GetAll()
        {
            return await dataContext.Books.OrderBy(a => a.Title)
                .Select(book => bookMapper.GetFromDataAccess(book))
                .ToListAsync();
        }
        public async Task<Book> GetById(Guid bookId)
        {
            var book = await dataContext.Books.FirstAsync(b => b.BookId == bookId);
            return bookMapper.GetFromDataAccess(book);
        }
        public async Task Add(Book book)
        {
            if (book == null)
            {
                throw new ArgumentNullException(nameof(book));
            }

            book.ValidateAndThrow();
            await dataContext.Books.AddAsync(bookMapper.GetFromDomain(book));
            await dataContext.SaveChangesAsync();
        }
        public async Task Edit(Book book)
        {
            if (book == null)
            {
                throw new ArgumentNullException(nameof(book));
            }

            book.ValidateAndThrow();
            var bookToEdit = await dataContext.Books.FirstAsync(b => b.BookId == book.BookId);
            bookMapper.Update(bookToEdit, book);
            await dataContext.SaveChangesAsync();
        }
        public async Task Delete(Guid bookId)
        {
            dataContext.Books.Remove(await dataContext.Books.FirstAsync(b => b.BookId == bookId));
            await dataContext.SaveChangesAsync();
        }
    }
}
In the Books Repository, we will provide two methods for getting either the list of books or one book by ID. Besides this, we have three methods for add, edit, and delete. Don’t forget to add the NuGet package for EntityFrameworkCore to the Repositories project.
You can notice that when we are expecting parameters that can be null we are handling the exception. More about exception handling here.
.NET 6 Web API Project
We have prepared all of the other layers, is now time to get our C# Web API project done. The first thing we need to start with is to add references from the other projects to our API project.
dotnet add reference ../DigitalLibraryAPI.DataAccess/DigitalLibraryAPI.DataAccess.csproj
dotnet add reference ../DigitalLibraryAPI.Domain/DigitalLibraryAPI.Domain.csproj
dotnet add reference ../DigitalLibraryAPI.Repositories/DigitalLibraryAPI.Repositories.csproj
The next thing we need to do is to get Dependency Injection (DI) in place. If you want to find out more about DI you can check out this very nice article by James Shore.
Dependency Injection
If you open Program.cs from the API project, you will notice that parts of the DI are already in place.
builder.Services.AddControllers();Let’s implement the DI for our mapper and repository as well.
builder.Services.AddScoped<IBookMapper, BookMapper>();
builder.Services.AddScoped<IBooksRepository, BooksRepository>();
Another thing we need to have in place is the DI for the DbContext. For this, we will add the references to the EntityFrameworkCore NuGet packages (the same we used for the Data Access project).
builder.Services.AddDbContext<MySqlDataContext>(options =>
{
    var connectionString = builder.Configuration.GetConnectionString("MySQLBooksConnectionString");
    options.UseMySql(connectionString, ServerVersion.AutoDetect(connectionString));
});
This line is resolving the connection to our MySql database. You can store the connection string in the app.settings.json file.
{
  "ConnectionStrings": {
    "MySQLBooksConnectionString": "server=localhost; database=digitallibrary; user=dlUser; password=DlPass123"
  },
  "Logging": {
    "LogLevel": {
      "Default": "Information",
      "Microsoft.AspNetCore": "Warning"
    }
  },
  "AllowedHosts": "*"
}
Controller
By default, dotnet new webapi command provides us with a default controller. We can go ahead and delete WeatherForecastController and the WeatherForecast, we don’t need them anymore. Let’s create the controller for our books:
using DigitalLibraryAPI.Domain.Entities;
using DigitalLibraryAPI.Repositories.Contracts;
using Microsoft.AspNetCore.Mvc;
namespace DigitalLibraryAPI.Web.Controllers
{
    [Route("api/[controller]")]
    [ApiController]
    public class BooksController : ControllerBase
    {
        private readonly IBooksRepository booksRepository;
        public BooksController(IBooksRepository booksRepository)
        {
            this.booksRepository = booksRepository;
        }
        [HttpGet]
        public async Task<IActionResult> GetAll()
        {
            return Ok(await booksRepository.GetAll());
        }
        [HttpGet("{id:Guid}")]
        public async Task<IActionResult> GetById(Guid id)
        {
            return Ok(await booksRepository.GetById(id));
        }
        [HttpPost]
        public async Task<IActionResult> Add([FromBody] Book book)
        {
            await booksRepository.Add(book);
            return Ok();
        }
        [HttpPut]
        public async Task<IActionResult> Edit([FromBody] Book book)
        {
            await booksRepository.Edit(book);
            return Ok();
        }
        [HttpDelete("{id}")]
        public async Task<IActionResult> Delete(Guid id)
        {
            await booksRepository.Delete(id);
            return Ok();
        }
    }
}
Testing the C# Web API
Now that we have implemented the last part of our application, is time to see if it’s working as expected. Run the API project and then open the URL from the console in your browser. If you add “swagger” to the URL from the terminal window (eg. https://localhost:7257/swagger), you should see something like this:
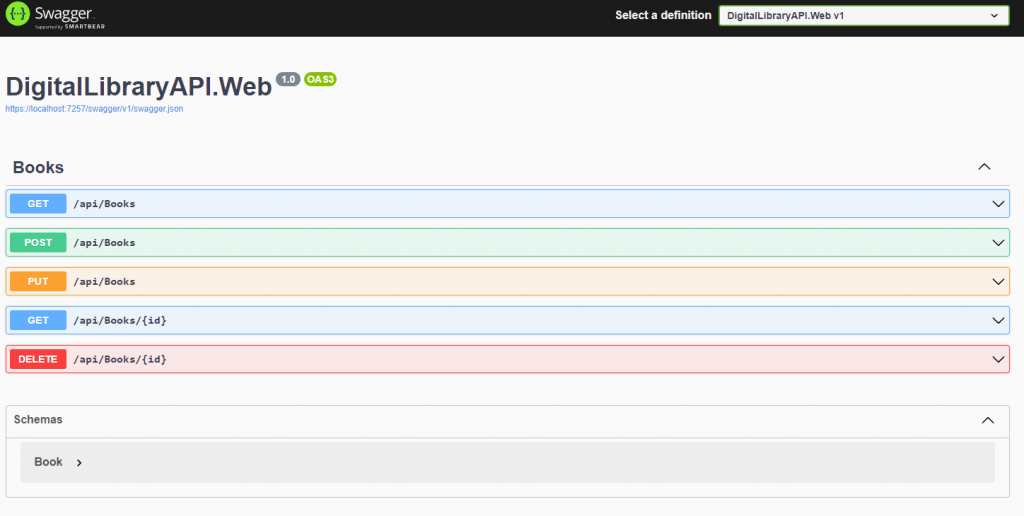
If you want to see how it works, choose any of the endpoints and click on try it out.
Besides Swagger, another tool you can use for testing your APIs is Postman .
We’re done!
You can find the source code on GitHub here . If you have any unclarities about this tutorial, if you have any questions or comments please use the comments section below. Thank you for reading!

No comments yet.