How to deploy .NET Core to Linux with Plesk and Vultr
In this article, we will look over how to deploy a .NET Core Web API to Linux and the cost will be just $5. That’s right, the monthly cost for maintaining a .NET Core Web API together with a database will be only $5. This is one of the cheapest private virtual server hosting for .NET Core applications.
We will use Vultr as the cloud provider for the Linux virtual machine and Plesk as the web host control panel.
Before the .NET Core release in 2016, the only way to deploy C# .NET applications was to deploy them to Windows machines. This came with the problem of Operating System costs and with some limitations. After the release of .NET Core, besides Windows OS, we now have the option to deploy to Mac OS or Linux.
I have to admit, I have more experience with Windows OS and it comes more naturally for me to deploy .NET Core applications. In this tutorial, I will provide you with the easiest way to deploy .NET Core applications to Linux. My main goal is to not use any Linux commands – or at least use a very small number of commands. If you are a Linux beginner like me or you don’t know how to work with Linux, this is the tutorial for you.
This page contains product affiliate links. I receive a small commission if you make a purchase after clicking on one of these links. This comes with no extra cost to you.
About Vultr
Vultr , founded in 2014, is on a mission to empower developers and businesses by simplifying the deployment of infrastructure via its advanced cloud platform. Vultr is strategically located in 27 data centers around the globe and provides frictionless provisioning of public cloud, storage, and single-tenant bare metal.
Vultr has made it a priority to offer a standardized highly reliable high-performance cloud computing environment in all of the cities they serve. Launching a cloud server environment in 27 cities around the globe has never been easier!
Vultr advantages
Geographic Footprint – Vultr’s 27 strategically placed points of presence in cities around the world make it more than likely you can launch a cloud environment close to you or your customers.
One Click Apps – Vultr’s one-click apps allow you to quickly launch WordPress blogs, game servers, development environments, and more with a single click.
Full Resource Control – Local administrator/root and out-of-band console access is provided on all bare metal and virtualized compute instances.
Upload ISO / Mount ISO – Created virtually unlimited Operating System options by uploading any ISO and mounting it on your cloud servers.
Linux, Windows, and BSD – Vultr natively supports a wide range of popular Linux, Windows, and BSD distributions.
No Long-Term Contracts – Hourly billing is standard for their products and services. Pay only for what you use.
Host your .NET Core Applications with Vultr
![]()
Create an account on Vultr and receive $100 to test the platform.
About Plesk
Plesk is the leading WebOps hosting platform to run, automate and grow applications, websites, and hosting businesses. Being the only OS-agnostic platform, Plesk is running on more than 384,000 servers, automating 11M+ websites and 15M+ mailboxes. Available in more than 32 languages across 140 countries, 50% of the top 100 service providers worldwide are partnering with Plesk today.
Plesk has simplified the lives of SysAdmins and SMBs since the early 2000s and continues to add value across multiple cloud services. The Plesk hosting platform effectively enables application developers by providing access to a simple and more secure web infrastructure managed by web pros and hosting companies.
Plesk will help us by facilitating a visual way for deploying the .NET Core Web API without using any Linux console lines of code.
Deploying a .NET Core Web API to Linux with Vultr
Before getting into it let’s see what we need to deploy. Well, in a previous article we learned how to create a .NET Core Web API with a MySql database. You can find the code we will deploy in this tutorial here .
When deploying a Web API and a database we have two approaches in regard to the resources that we will use. One would be to deploy the API and the database to the same server and the second one is to deploy them to separate servers. The first option has the advantage that is cheaper at the beginning. The second option has the advantage that it scales easier once our application usage is growing.
Deploy new server
For the deployment of our Web API, we will use the Instances section from Vultr ’s Products. When we choose to deploy a new server we have four main types of servers that we can use:
- Optimized Cloud Compute – Virtual machines for more demanding business apps, e.g. production websites, CI/CD, video transcoding, or larger databases.
- Cloud Compute – Virtual machines for apps with bursty performance, e.g. low traffic websites, blogs, CMS, dev/test environments, and small databases.
- Cloud GPU – Virtual machines with fractional NVIDIA GPUs for AI, machine learning, data analytics, scientific computing, and HPC. Powered by Vultr Talon.
- Bare Metal Servers – Single-tenant bare metal for apps with the most demanding performance or security requirements.
Under the Optimized Cloud Compute we can choose from four categories:
- General Purpose – Often a good starting point, these VMs provide a typical balance of CPU, RAM, and NVMe SSD resources.
- CPU Optimized – For compute-bound applications, these VMs provide proportionally more CPU than they do RAM and NVMe SSD.
- Memory Optimized – For memory-bound applications, these VMs provide proportionally more RAM than they do CPU and NVMe SSD.
- Storage Optimized – These VMs provide especially generous amounts of NVMe SSD storage to accompany a typical balance of CPU and RAM.
Our example doesn’t require so many resources, so in this case, we will use Cloud Compute – Regular Performance. This is one of the cheapest private virtual server hosting and it will cost us only $5 a month to host our .NET Core Web API.
Now let’s get into deploying our Vultr Cloud Server.
- Go to Products / Deploy Server
- Choose the server type, CPU, and Storage Technology. In my case, I chose Cloud Compute, Intel regular performance.
- Pick the location where you want to deploy the server. You can choose from a multitude of locations spread across America, Europe, Australia, and Asia.
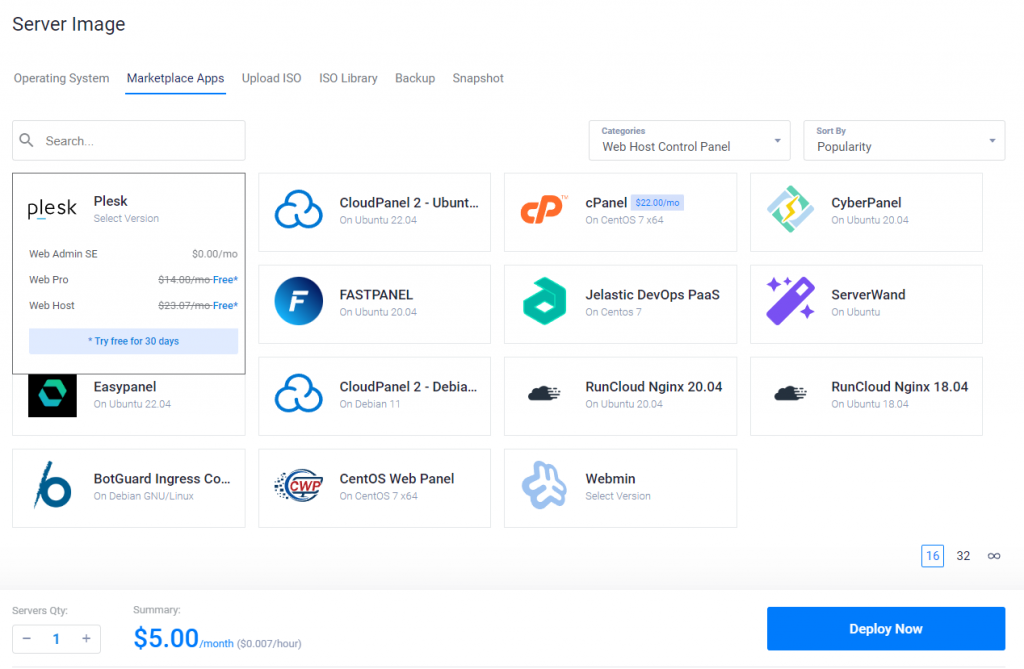
- Now is the time to choose the server image. In this section, we are going to configure the installation of our server. For our example, I am going with Ubuntu as the operating system and from the Marketplace Apps, I chose Plesk Web Admin SE as the Web Host Control Panel. Choosing Plesk as the control panel is essential if we want to deploy our .NET Core Web API without having to write any lines of Linux commands.
- Pick the server size, auto-backup, and other additional features
- Give your server a name and click Deploy Now
In less than two minutes, the deployment of the server is ready. After the deployment of the server, Plesk will start the installation automatically. This will take less than 5 minutes. The last thing left to do is to access Plesk Control Panel. Vultr provides details on how to access the Plesk Control Panel on your new instance.
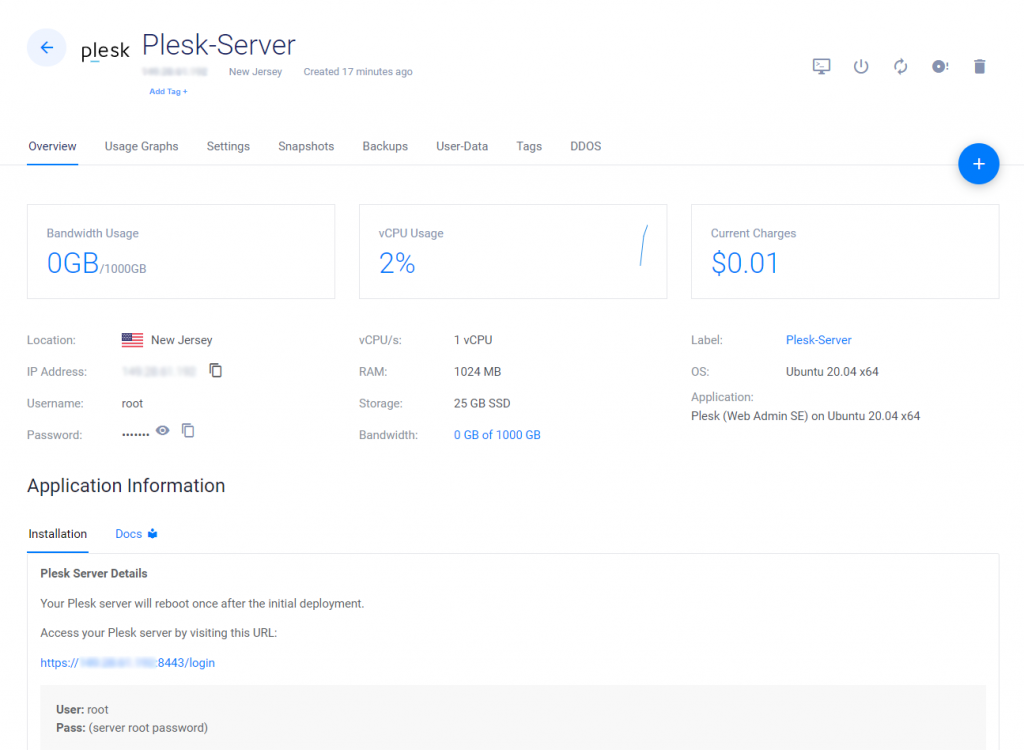
Now click on the URL provided in the installation section, this will take you to the control panel for your server. For authentication, you will need to use the user root and the password found in the Server Overview section. Plesk asks you to provide your contact information and a new password to use the next time you log in. Remember that the next time you will log in you will no longer use the root user but the admin user. My recommendation is to follow Plesk instructions on how to create a new user (not using root or admin as the username). The default users are easier to hack.
Prepare Plesk for .NET Core
Before going to the creation of our website in Plesk, we need to add an extension that will allow us to deploy .NET Core applications to Plesk. We will use .NET Toolkit extension to achieve this. If you visit the .NET Toolkit extension page you will notice that it requires Plesk version 18.0.44 or above. If you don’t have the latest version of Plesk I recommend installing it. Go to Tools & Settings / Updates / Install and update product.
In order to install .NET Toolkit you can use the Extensions section from Plesk or use the Install on my server button from the .NET Toolkit page.
Configure the website
Make sure you have installed the .NET extension before proceeding with the configuration of the website.
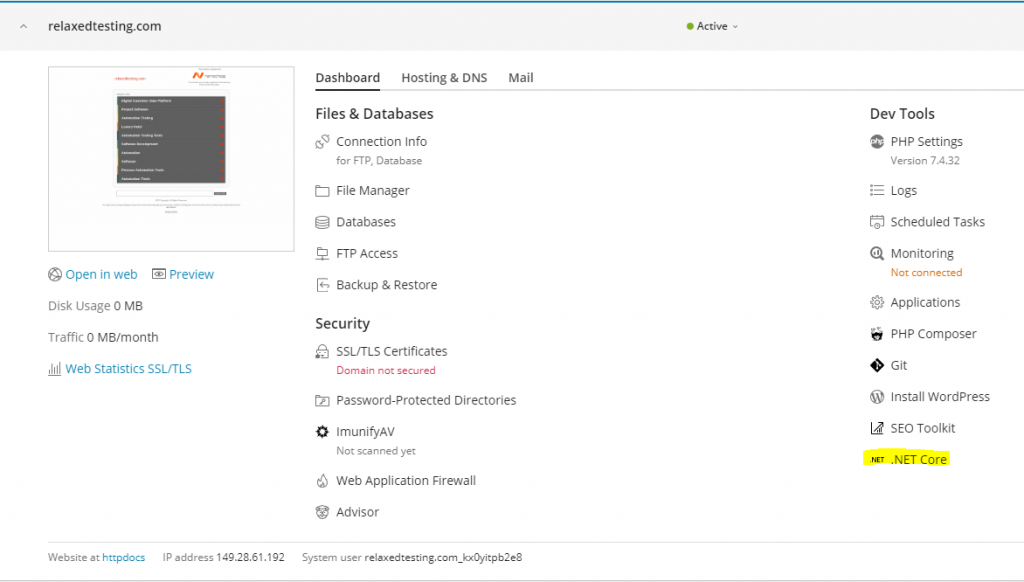
Go to Website & Domain and add a new domain.
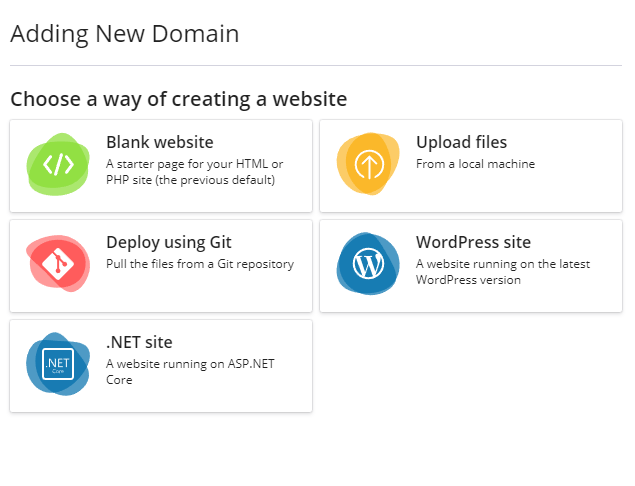
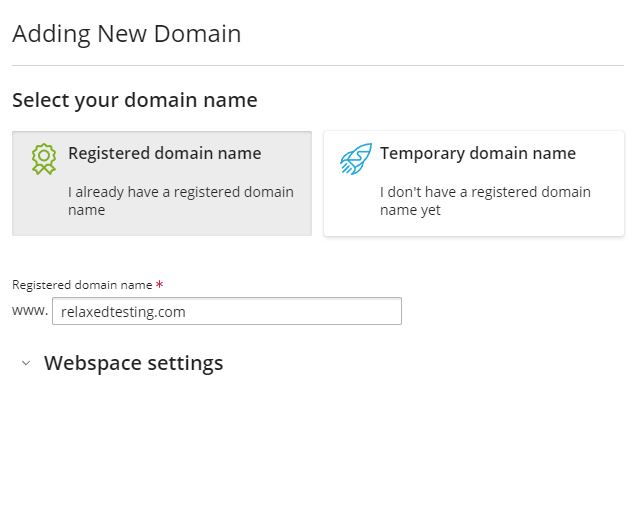
Choose .NET site and proceed to select your domain name. Here you have two options, using a Registered domain name or using a Temporary domain name. I will use a domain that I already own and I will configure it for this tutorial.
Plesk will configure for us things like DNS and Email. We chose to deploy a .NET site, so now is the time to configure the application. In this step, we will choose to install the application using File Manager.

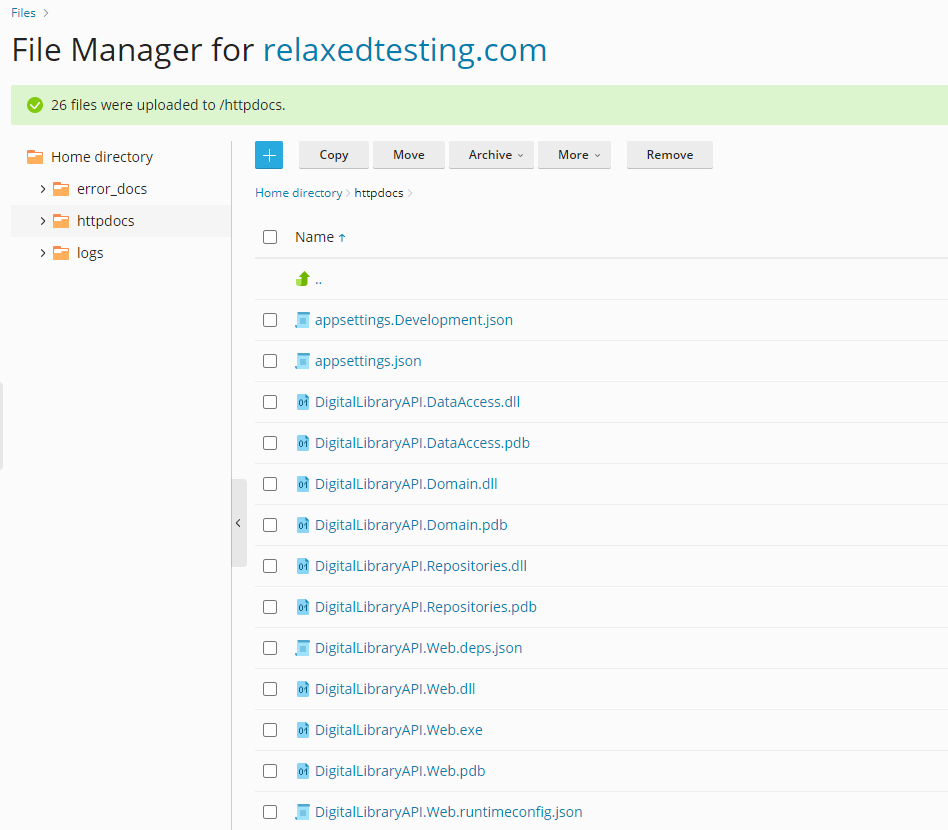
Click on Go to File Manager, remove the files already found in the httpdocs folder and upload the published files from your .NET Core Web API. For the purpose of this tutorial, I used the Upload Directory option from Plesk, but you can use other options like FTP or SSH. After you uploaded your files you should see something like this:
Before publishing your .NET Core Web API from Visual Studio Code, make sure you have the following lines of code in your Program.cs class:
if (!app.Environment.IsDevelopment())
{
    app.UseHttpsRedirection();
}
app.UseForwardedHeaders(new ForwardedHeadersOptions
{
    ForwardedHeaders = ForwardedHeaders.XForwardedFor | ForwardedHeaders.XForwardedProto
});
These will ensure that everything will work when you deploy to a Linux machine.
Before previewing our .NET Core Web API, we need to do one more thing, configure the Website to work with .NET Core.
After you click on .NET Core, you need to configure the application info to look something like this:
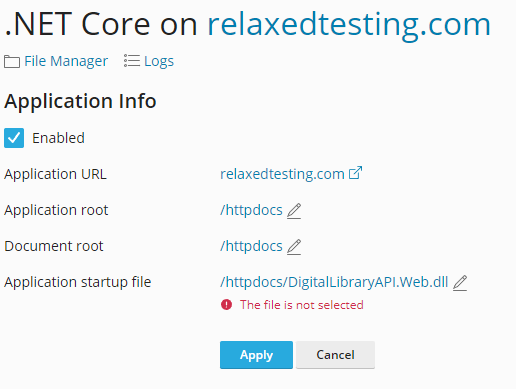
The Application root and the Document root has to be httpdocs or the location where you uploaded the publish files. The application startup file will be the dll file for the entry point of your application.
If you skip this step with the configuration of .NET Core, when accessing the preview to the application you will get a 403 Forbidden error.
If you followed the steps above and go to preview the Web API in the browser you should see the Swagger page. The URL for the preview should look something like this http://[IP Address]/plesk-site-preview/relaxedtesting.com/https/[IP Address]/swagger/index.html.
Configure MySql
We have deployed the .NET Core Web API and now have access to it from the preview URL. If we try out any end-point from our API using Swagger it won’t work because MySql is not configured yet. Don’t forget that you have logs that can provide you with valuable information in case something is crashing. You can find the logs in the Dashboard of your website under the Logs section.
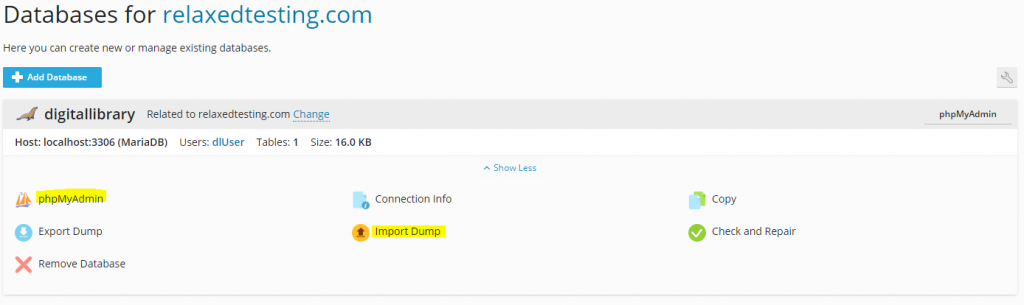
The .NET Core Web API we are using in this tutorial is connecting to a MySql Database. Let’s configure the database. For this, we first have to go to Plesk Databases and Add Database.
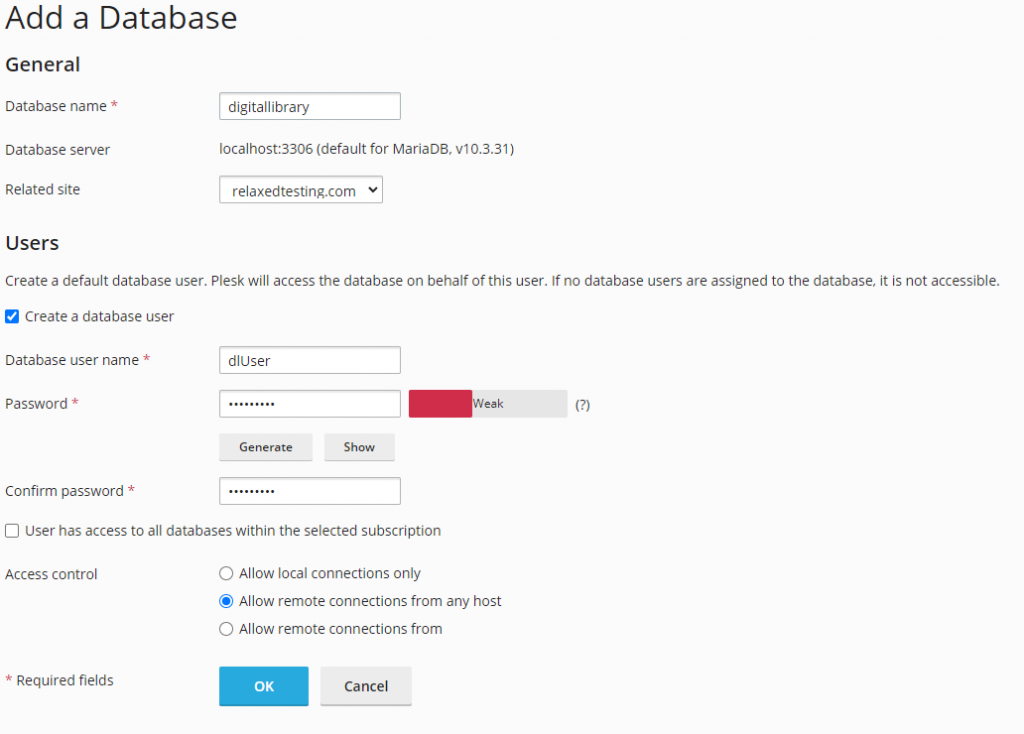
For creating the database you can either use phpMyAdmin or import a dump file with the database.
Configure DNS
We want to use the .NET Core Web API by accessing an actual domain. For this, we need to set up the DNS records. When Plesk creates the website for us, all the DNS records that we need were set up for us. For resolving the DNS we have two options. One option is to manage our DNS settings in Plesk and host our nameservers. The second option is to use an outside provider for managing our DNS records.
In this example, I will use the DNS records provided by Plesk and configure the nameservers with the registrar. In my case, I am using Namecheap as the domain registrar. I am using them for a few years and I found them to deliver domains at the best prices with the best service.
Depending on the registrar you are using, you will need to configure a personal DNS server with them and add your nameservers. Please bear in mind that the DNS propagation may take up to 24 hours.
Another option and I would say the most reliable option is to manage your DNS records with Namecheap . They have two options for DNS hosting. FreeDNS with dynamic DNS safeguards your DNS hosting and keeps your website presence during outages. The second option is PremiunDNS. Your website is always online, thanks to the global PremiumDNS Anycast service. Your customers enjoy 100% DNS uptime and super-fast website delivery speeds. Don’t worry about the price for PremiumDNS, currently, you can get it for less than $3/yr.
One more thing we can do before going to test our API is to set up SSL. For the SSL I would recommend using SSLs .com. SSLs.com is making the web a more secure space with its wide range of cheap SSL certificates, complete with easy activation, installation, and great customer service. Don’t worry about the price, you can find SSL certificates for less than $3/yr.
Plesk is also offering an option to install a free basic certificate provided by Let’s Encrypt.
Test the application
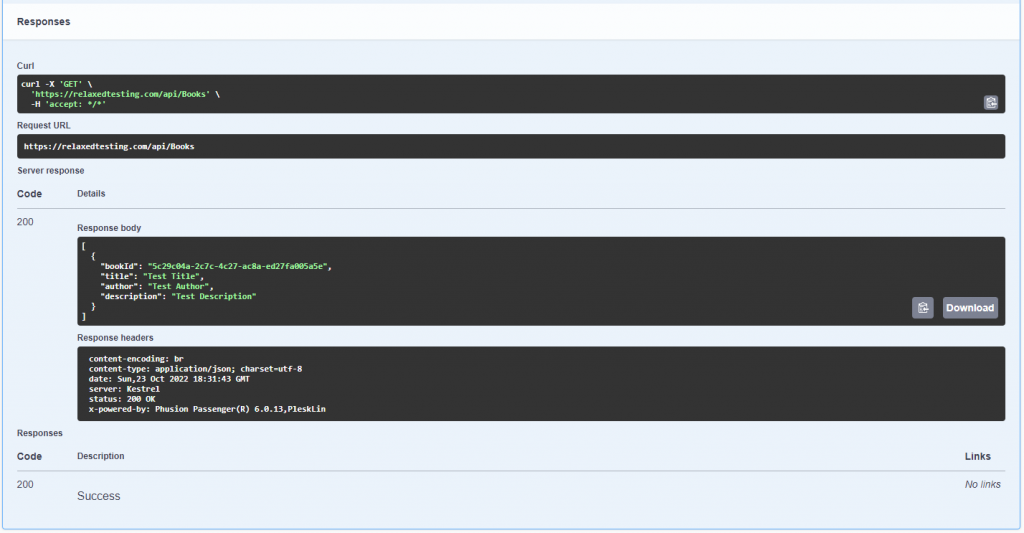
We have set up all that needed to be set up, now is time to test and see if everything is working properly. If you try out the books endpoint from Swagger you should see something like this:
If you prefer a more visual tutorial, here’s a video.
Subscribe to my newsletter
Subscribe to Relaxed Coder and be up to date with the latest articles.
Conclusions
We have learned how to deploy a .NET Core Web API with MySql database using Plesk and Vultr and have hosting that will cost us just $5. If you want to deploy a new application that will be intensely used I would recommend splitting the application between multiple servers. If you are looking to deploy an application that will have a UI, an Web API, and a Database, I would recommend deploying three servers, one for each. This way it will be way easier to scale the resources as the application usage grows.
Thank you for your time! If you have any questions please use the comments section below.

No comments yet.