Fast and Easy Way to Deploy .NET Core with Vultr
This article will teach you how to deploy a .NET Core application to Vultr VPS using Windows IIS. To be more precise, we will deploy a Web API to IIS. By following this tutorial, you’ll quickly master the essential steps to successfully launch your .NET Core application. In this guide, we will show you a streamlined approach to deploying your .NET Core application on a Vultr VPS.
We will use an already implemented .NET 6 Web API, you can find the source code here . If you want to learn how to implement a .NET 6 Web API using Visual Studio Code I wrote an article about this topic. If you want to find out how you can host your .NET Core applications on Linux you can check this article on How to deploy .NET Core to Linux with Plesk and Vultr .
This page contains product affiliate links. I receive a small commission if you make a purchase after clicking on one of these links. This comes with no extra cost to you.
Why Vultr?
Vultr is offering top-notch cloud hosting and empowers developers and businesses by simplifying the deployment of infrastructure via its advanced cloud platform. You might ask yourself what makes Vultr different from other competitors. Here are the key differentiators:
Geographic Footprint – Vultr’s 27 strategically placed points of presence in cities around the world make it more than likely you can launch a cloud environment close to you or your customers.
One Click Apps – Vultr’s one-click apps allow you to quickly launch WordPress blogs, game servers, development environments, and more with a single click.
Full Resource Control – Local administrator/root and out-of-band console access is provided on all bare metal and virtualized compute instances.
Upload ISO / Mount ISO – Created virtually unlimited Operating System options by uploading any ISO and mounting it on your cloud servers.
Linux, Windows, and BSD – Vultr natively supports a wide range of popular Linux, Windows, and BSD distributions.
No Long-Term Contracts – Hourly billing is standard for their products and services. Pay only for what you use.
Host your .NET Core Applications with Vultr
Create an account on Vultr and receive $100 to test the platform.
Hosting .NET Core on IIS
Hosting your .NET Core application on IIS might sound more complicated but is not. I am here to make your journey a bit easier with a step-by-step example of how to deploy a .NET Core application on Windows using IIS. For the deployment of our .NET Core Web API we will use a virtual machine provided by Vultr . So in the first step let’s go ahead and deploy a new virtual machine.
Deploy new Vultr instance
With Vultr, the deployment of new virtual machines is fast and easy. Here are the steps for deploying a new Windows Server:
- Go to Products / Instances and click on Deploy New Server
- Choose the type of server you want to deploy. There are 4 types of servers you can deploy: Optimized Cloud Compute, Cloud Compute, Cloud GPU, and Bare Metal Servers.
- Pick the server location where you want to deploy your server. You have plenty of options from America, Europe, Australia, or Asia.
- Under Server Image choose Windows Server and the version you want to install.
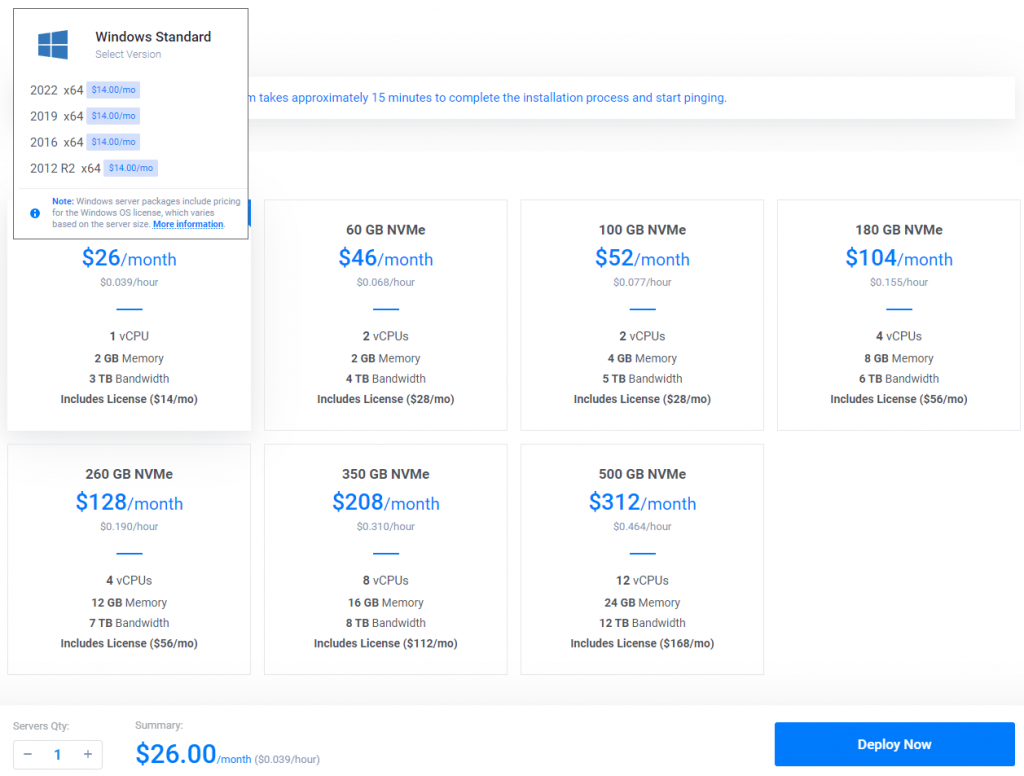
- Pick the Server Size that best suits your needs. You have a great variety of server sizes from which to choose.
- To make sure you don’t lose any data you can enable the auto-backup for your server
- You have a few additional features at your disposal, among them DDSO protection that you can enable – better to be safe than sorry
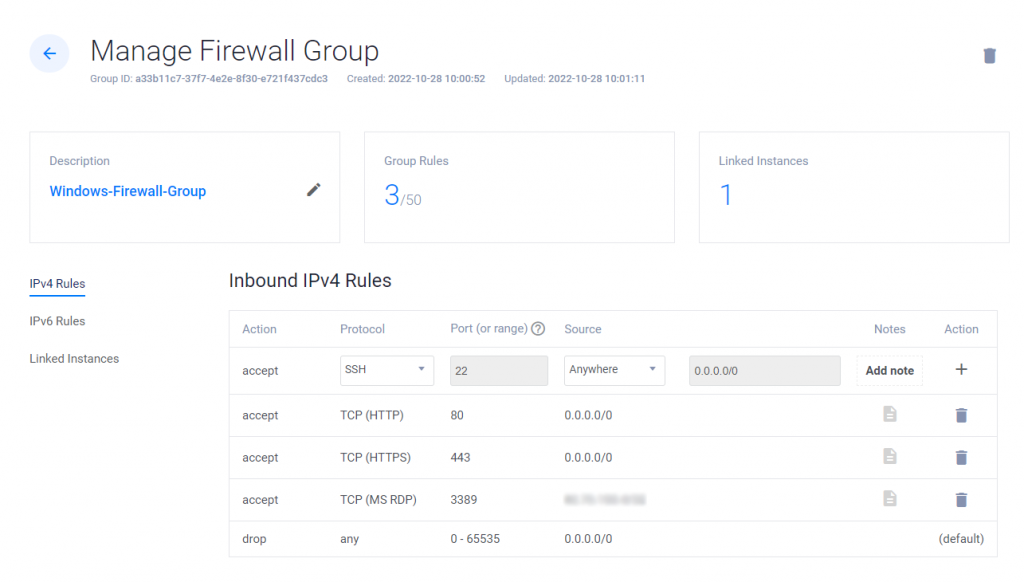
- Enable Firewall. This step is optional but I highly recommend enabling the Vultr firewall. Just go to Products / Firewall / Add Firewall Group. Here is what the Firewall rules for my example look like:
- Give your server a name, add a label if you want, and click on Deploy Now.
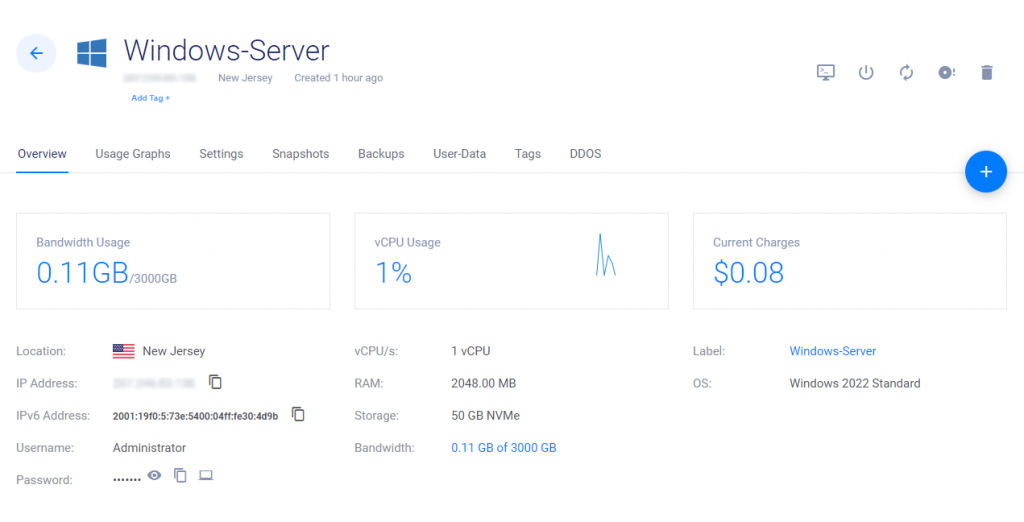
Within a few minutes, Vultr creates the Windows Server and is ready to use. In my case it took me around 2-3 minutes to have the server up, running, and ready to use.
Setup Windows Server
You can now connect to your Windows Server and start configuring it. There are two options to remotely connect to the server. The first option is by using Vultr Console and the second option is Windows Remote Desktop Connection (RDP). In the steps where we deployed a new server, under Firewall rules you may have noticed I have configured a special rule to allow me to RDP to my server from my current IP address. I recommend not allowing RDP connections from everywhere as this can be a serious security issue.
In order to remote connect to the Windows Server you need the IP address, the user created during the deployment of the server, and the password.
For hosting a .NET Core application we need to set up a few things in Windows Server:
- Go to Server Manager / Manage / Add Roles and Features
- Under Server Roles, choose Web Server IIS
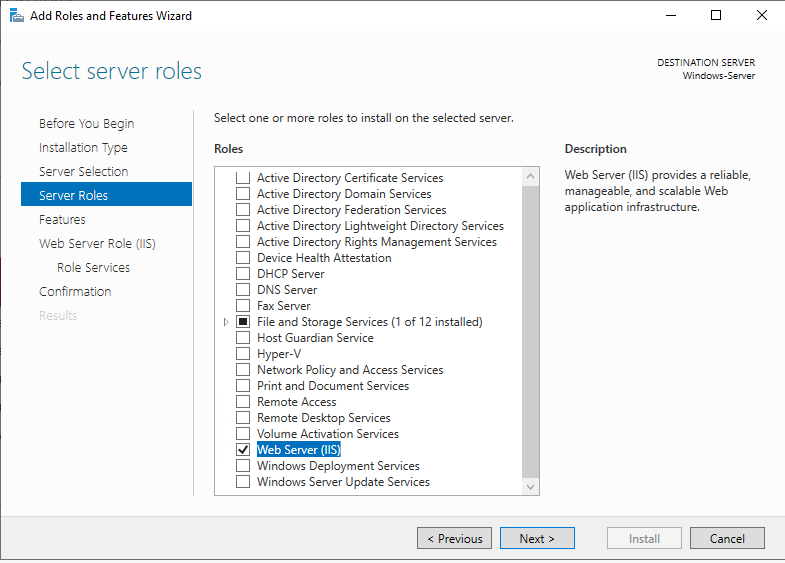
- From the Roles Services step choose HTTP Redirection, FTP, and other services you plan to use.
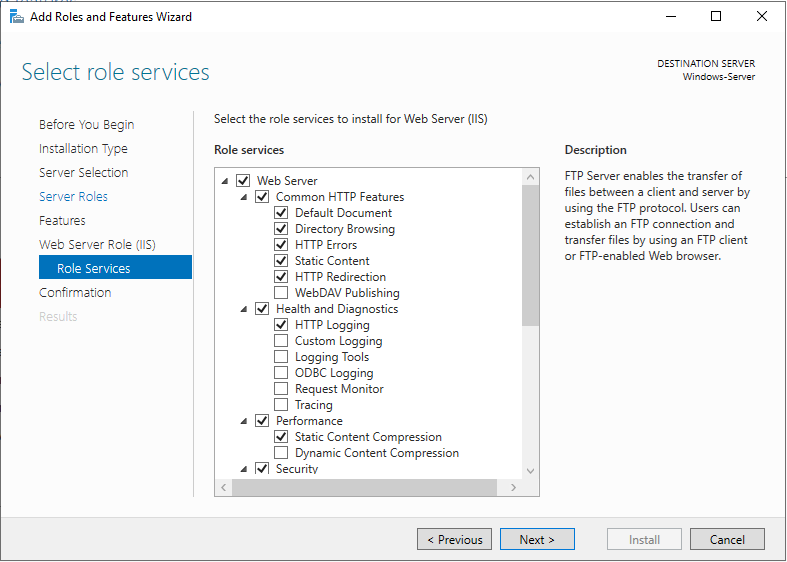
- Once you enabled the roles and features on the server is time to download and install .NET Core Hosting Bundle .
- Restart Windows Server.
Configure Web API in IIS
The prerequisites for deploying a new .NET Core application are now installed and we can go further with adding a new IIS Website.
- Go to Internet Information Services (IIS) Manager / Your Server Name / Sites / Add Website
- Add a site name, choose the location where you have the .NET Core Web API publish files and add a hostname
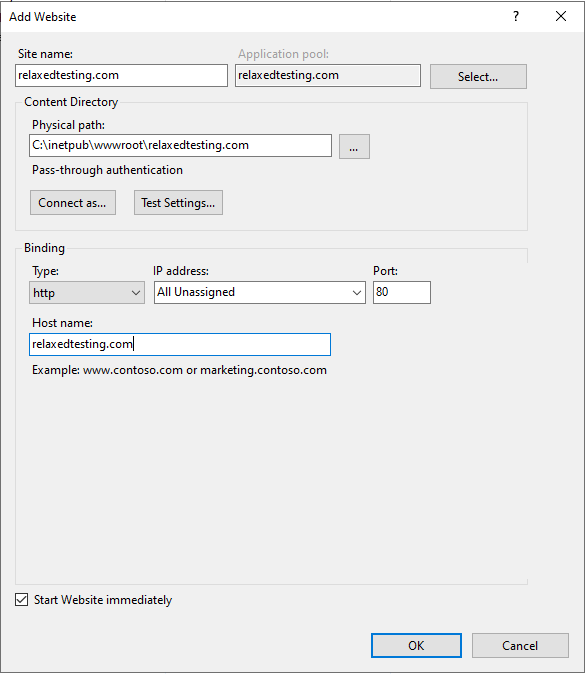
- Click OK and the website should be up and running
Before we can have an initial test to see if the Web API is functional we need to set up DNS.
Setup DNS on Namecheap
Before you go ahead and configure the DNS for your .NET Core Web API, make sure you have a domain. For domain registration and DNS management, I chose to use Namecheap .
Namecheap began in 2000 with a mission to deliver the best domains at the best prices with the best service. Since then they added hosting, security, managed WordPress, and a whole range of innovations to their platform. Getting a domain from Namecheap is fast, easy, and cheap.
As for the configuration of DNS records, first, go to your domain list and click on manage domain. Under nameservers make sure you are using the Namecheap DNS.
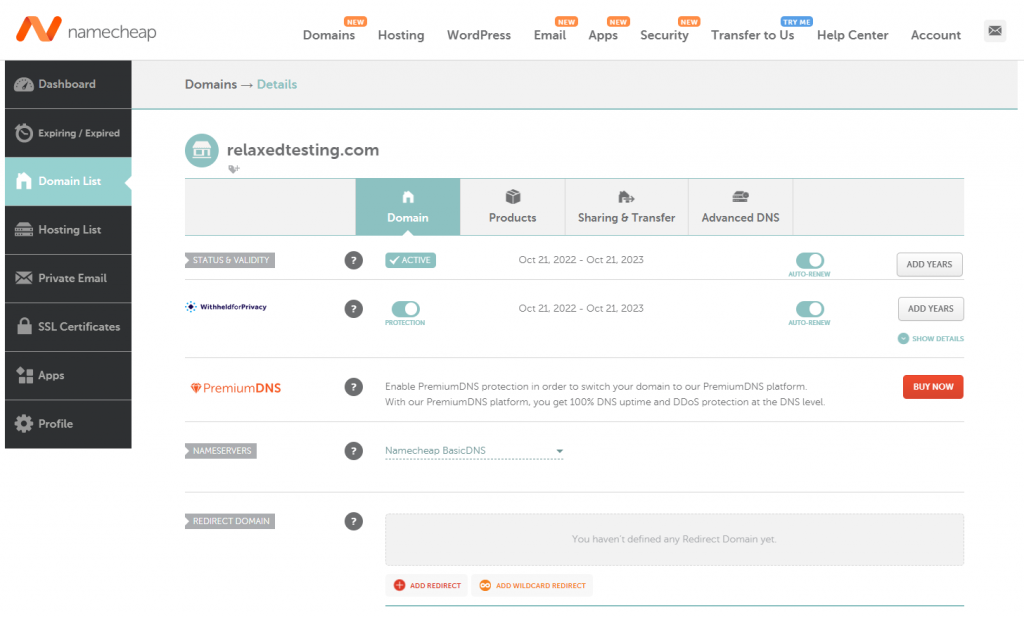
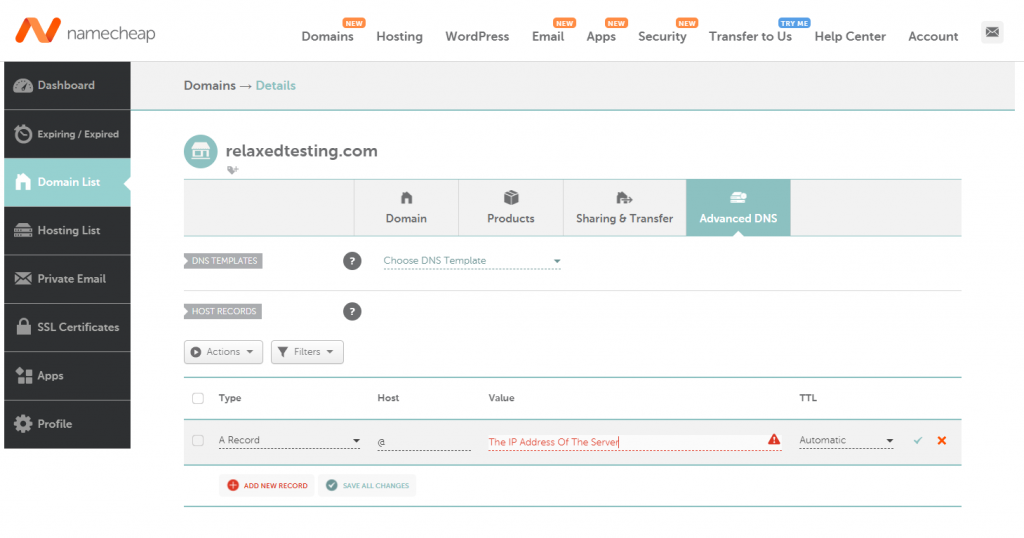
You have two options to manage DNS with Namecheap . Free DNS – keep your online presence. FreeDNS hosting makes sure your domain is visible to the Internet, and with secondary DNS backup avoids any gaps in your website’s availability. The second option is Premium DNS – this service will always be on duty, easily able to monitor and intuitively secure DNS hosting on your behalf. Get DNS Security Extensions (DNSSEC) support to combat DNS attacks, super-fast DNS speeds with global Anycast servers handling the busiest of websites and your queries, and your website 100% available — for one hugely affordable price–per–year. Forget about lost connections and data leaks. Advanced DNS security with PremiumDNS has you covered. Don’t worry about the price of Premium DNS, at the moment is under $5/yr.Getting back to the problem at hand, after you made sure you are using Namecheap DNS, go to the Advanced DNS section. Add a new host record of type A, under Host write “@” and the value should point to the IP address of the Windows Server you created with Vultr .
Install and configure MySql
Download the latest build of MySql from here . Install it on the Windows Server you created. For importing the database or for other SQL operations you can use a GUI. I have used MySQL Workbench in the past and still using it now. You can download the latest build from here . Just follow the installation process for MySql and for MySql Workbench.
Generate SSL Certificate with SSLs.com
I am sure you want your .NET Core applications to be safe and served via HTTPS instead of HTTP. For this, we will need to install an SSL certificate on our IIS server. For the SSL certificate, I chose SSLs .com. SSLs.com is for everyone, whatever the size and scope of the project. From small business websites to niche blogs run by tiny teams or individuals with a small budget, they got you covered. You don’t need to worry about spending a fortune or facing a steep technical learning curve. So you can focus on making your vision a reality, safe in the knowledge that your site is safe and secure. You can find SSL certificates on SSLs .com for less than $4/yr.
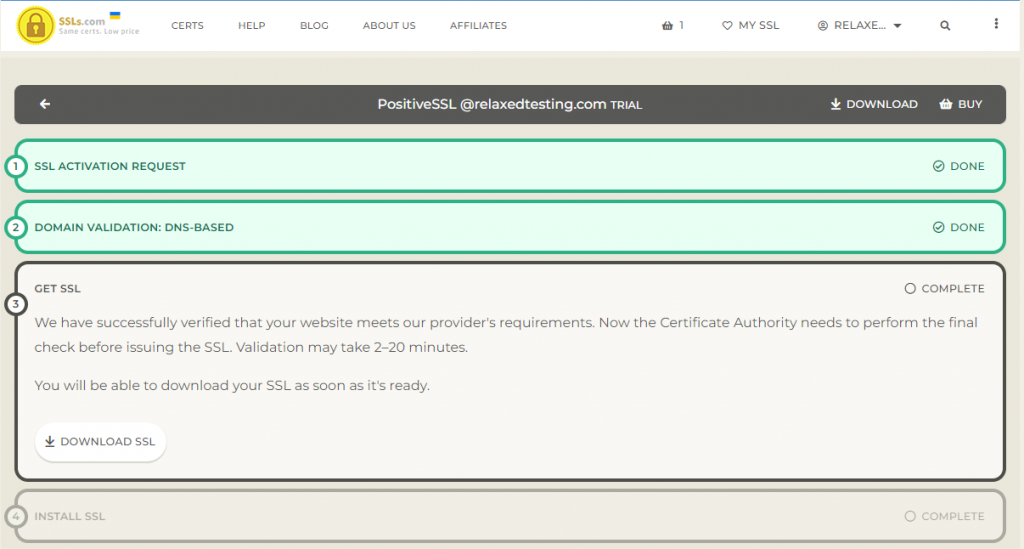
Before installing the SSL on the IIS server we will generate the SSL certificate. Go to Certs and choose the plan that best fits you and then go thru the configuration process. The main steps consist of
- Request and activate the certificate
- Validate the domain where you will use the certificate
- Download the SSL Certificate
- For IIS, before installing you need to convert the certificate to pfx format
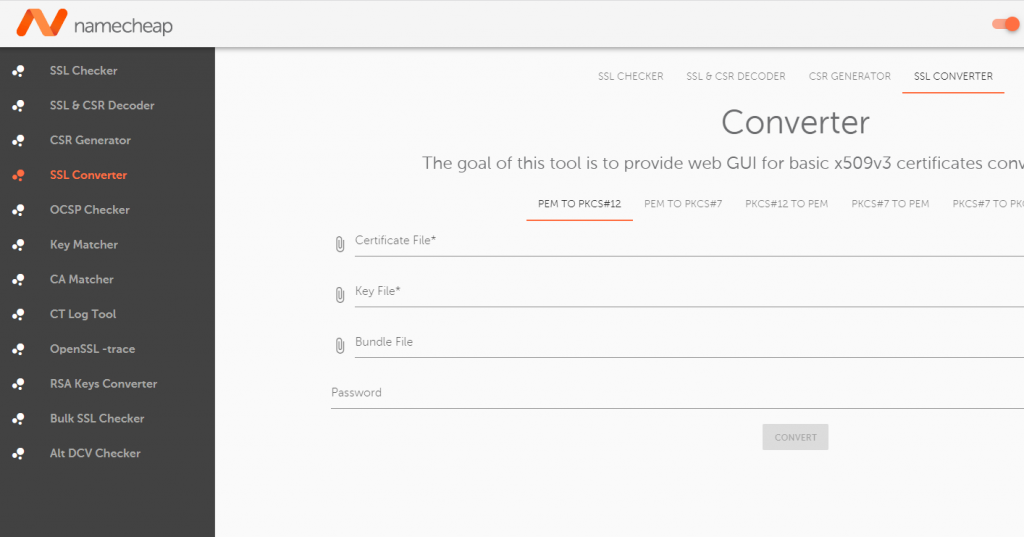
For the conversion of the SSL certificate click on Check Installation and then go to SSL Converter. Provide the files needed in this step – all the files you downloaded when you clicked on Download SSL.
What’s left to do now is to transfer the SSL Certificate in pfx format to your Windows Server. You can copy all the files you need to the Windows Server via RDP, FTP, or any other method of your choice.
Install SSL Certificate to IIS
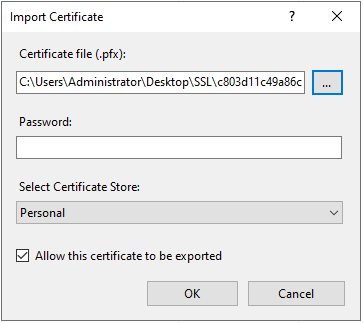
Once you have the SSL Certificate in pfx format, the installation is rather straightforward. Go to IIS Manager, select the server name from the right side, and double-click Server Certificates. Now go to Import and choose the pfx file.
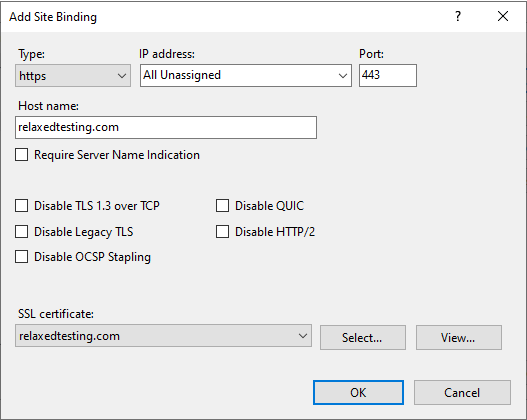
The next step is to add a new binding to the .NET Core application. For this, you need to go on the website in IIS, choose Bindings and click Add. Write the hostname and choose the SSL certificate.
Redirect HTTP to HTTPS using IIS URL Rewrite
You can use the .NET Core Web API via HTTPS once you installed the SSL Certificate and added the proper binding from IIS. Without having a redirect from HTTP to HTTPS, the .NET Core application is accessible from both of them. If you want to enforce the users to use only HTTPS you need to set up a redirect rule.
Before adding the redirect rule we need to install an extension to IIS. You can find the IIS URL Rewrite extension here.
Once you have installed the URL Rewrite URL you can update the web.config file for the website with a set of rules. After adding the rules, your web.config file should look something like this:
<?xml version="1.0" encoding="utf-8"?>
<configuration>
  <location path="." inheritInChildApplications="false">
    <system.webServer>
      <handlers>
        <add name="aspNetCore" path="*" verb="*" modules="AspNetCoreModuleV2" resourceType="Unspecified" />
      </handlers>
      <aspNetCore processPath="dotnet" arguments=".DigitalLibraryAPI.Web.dll" stdoutLogEnabled="false" stdoutLogFile=".logsstdout" hostingModel="inprocess" />
      <!-- Start of URL Rewrite Rules -->
            <rewrite>
            <rules>
                <rule name="Remove WWW" patternSyntax="Wildcard" stopProcessing="true">
                    <match url="*" />
                    <conditions>
                        <add input="{CACHE_URL}" pattern="*://www.*" />
                    </conditions>
                    <action type="Redirect" url="{C:1}://{C:2}" redirectType="Permanent" />
                </rule>
                <rule name="HttpToHttps" stopProcessing="true">
                    <match url="(.*)" />
                    <conditions>
                        <add input="{HTTPS}" pattern="^OFF$" />
                    </conditions>
                    <action type="Redirect" url="https://{HTTP_HOST}/{R:1}" />
                </rule>
            </rules>
        </rewrite>
        <!-- End of URL Rewrite Rules -->
    </system.webServer>
  </location>
</configuration>
Test the application
One last thing remains to do, test that everything works. If the DNS propagation has finished you should be able to access the .NET Web API by calling the domain URL via HTTPS. In my case, this is how the URL looks for getting the books from the API: https://relaxedtesting.com/api/books.
Subscribe to my newsletter
Subscribe to Relaxed Coder and be up to date with the latest articles.
I also prepared a video tutorial. If a video is more your cup of tea be my guest 🙂
Conclusions
We have learned how to deploy a .NET Core Web API to Windows IIS with MySql database using Vultr for the hosting part, Namecheap for domain and DNS management, and SSLs .com for SSL Certificate. If you want to deploy a new application that will be intensely used I would recommend splitting the application between multiple servers. If you are looking to deploy an application that will have a UI, an Web API, and a Database, I would recommend deploying three servers, one for each. This way it will be way easier to scale the resources as the application usage grows.
If you prefer using Linux, I have a tutorial that will help you deploy .NET Core applications to Linux without the need to use a Linux terminal. If you want to learn more, go ahead and read my tutorial on How to deploy .NET Core to Linux with Plesk and Vultr .
This was a long one, so thank you for your time! If you have any questions please use the comments section below.

