The Ultimate Guide to Vultr WordPress Hosting
Do you feel you had it with WordPress shared hosting and want more for what you pay? VPS hosting is the best option for WordPress shared hosting. This option offers more performance for less money than classic WP hosting. Hosting your WordPress blog on your own VPS might sound very intimidating. Don’t worry, if you follow this tutorial you will see that it is very simple and straightforward.
This page contains product affiliate links. I receive a small commission if you make a purchase after clicking on one of these links. This comes with no extra cost to you.
WordPress Shared Hosting vs VPS Hosting
Before going into the tutorial let’s see what are the differences between WordPress shared hosting and VPS hosting.
Shared Hosting Pros and Cons
Pros:
- Usually the cheapest type of hosting – when you choose the hosting you want make sure you verify the costs from the second year. Usually, you get a very low price in the first year, and starting from the second one it costs double or more the price than the first year.
- Great for beginners and novices – don’t worry, if you follow this tutorial you will see that is not that complicated to host WordPress on your own VPS
- Decent performance when it comes to static and low-traffic websites
Cons:
- Being a shared hosting means no dedicated resources
- Higher security risks
- You are sharing the resources so if the sites you share a server with need more resources it will affect your performance
VPS Hosting Pros and Cons
Pros:
- Great value for money – you get way more performance-wise for less or the same money
- Customizable control – you can customize more than you could with shared hosting
- Scalable plans that grow with your blog/website – easily increase or decrease the VPS based on your needs
Cons:
- Can be more expensive than shared hosting -but you do get way more performance.
- Requires some very basic technological knowledge – don’t worry, this tutorial will help in getting passed this.
- You need to have some idea of how much storage, CPU, and RAM you will need. If you have a newly established website you can start from the cheapest plan and build from there.
Host your .NET Core Applications with Vultr
![]()
Create an account on Vultr and receive $100 to test the platform.
Vultr WordPress Hosting on VPS
In this tutorial, we will use Vultr for the provisioning of our VPS. Vultr is offering top-notch cloud hosting and empowers developers and businesses by simplifying the deployment of infrastructure via its advanced cloud platform.
With the current prices on Vultr , you can get WordPress VPS hosting for as low as $2.5/month. Altho I would recommend starting from the next tiers as the $5/month tier. From this tier onward you can configure the hosting environment with a control panel. In our case, we will use Plesk.
Deploy New VPS with Vultr
Deploying a new Server with Vultr is fast and easy. These are the steps I followed for deploying a Server on Vultr with Plesk as the Control Panel:
- Go to Products / Deploy Server
- Choose the server type, CPU, and Storage Technology. In my case, I chose Cloud Compute, Intel regular performance.
- Pick the location where you want to deploy the server. You can choose from a multitude of locations spread across America, Europe, Australia, and Asia.
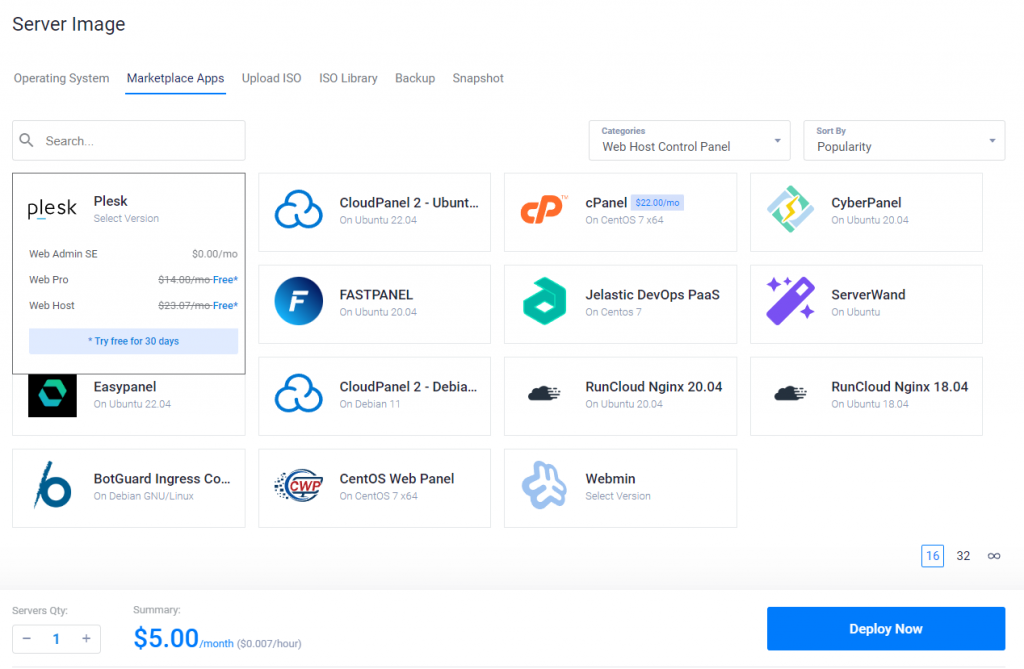
- Now is the time to choose the server image. In this section, we are going to configure the installation of our server. For our example, I am going with Ubuntu as the operating system and from the Marketplace Apps, I chose Plesk Web Admin SE as the Web Host Control Panel. Instead of Plesk, you can choose the Control Panel of your choice.
- Pick the server size, auto-backup, and other additional features
- Give your server a name and click Deploy Now
In less than two minutes, the deployment of the server is ready. After the deployment of the server, Plesk will start the installation automatically. This will take less than 5 minutes. The last thing left to do is to access Plesk Control Panel. Vultr provides details on how to access the Plesk Control Panel on your new instance.
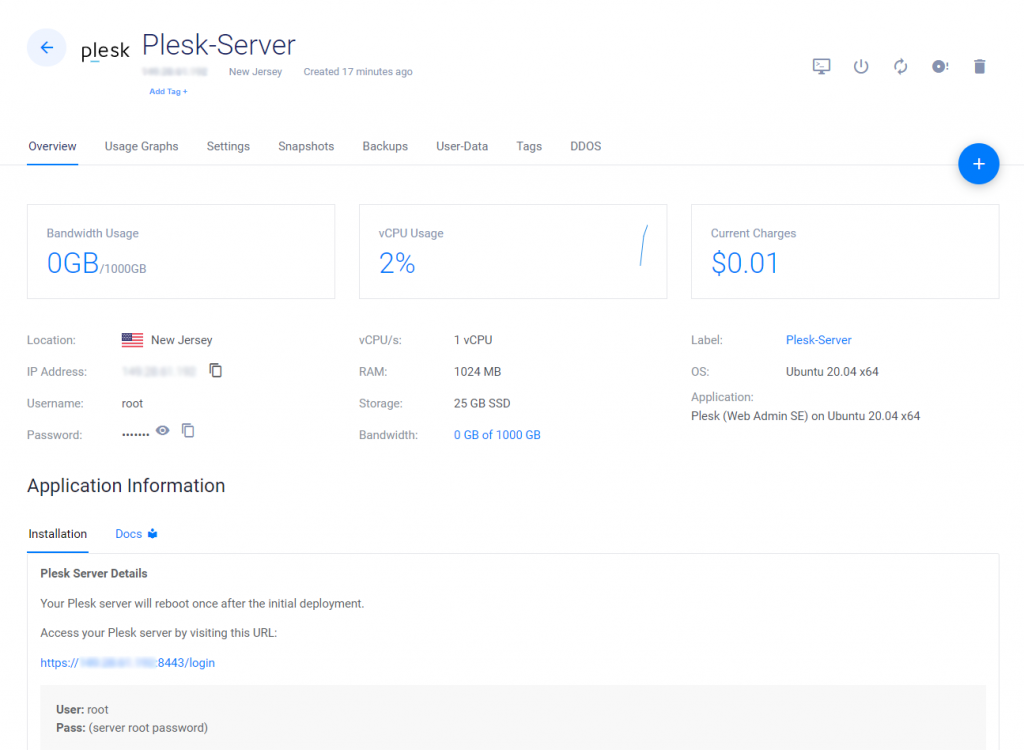
Now click on the URL provided in the installation section, this will take you to the control panel for your server. For authentication, you will need to use the user root and the password found in the Server Overview section. Plesk asks you to provide your contact information and a new password to use the next time you log in. Remember that the next time you will log in you will no longer use the root user but the admin user. My recommendation is to follow Plesk instructions on how to create a new user (not using root or admin as the username). The default users are less secure.
Update Plesk to the Latest Version
Before going any further with the setup of our WordPress website I recommend updating Plesk to the latest version. For this go to Tools & Settings / Updates / Install and update the product. This process takes around 5 to 10 minutes, depending on the Server Instance you created.
Add New Website and Domain
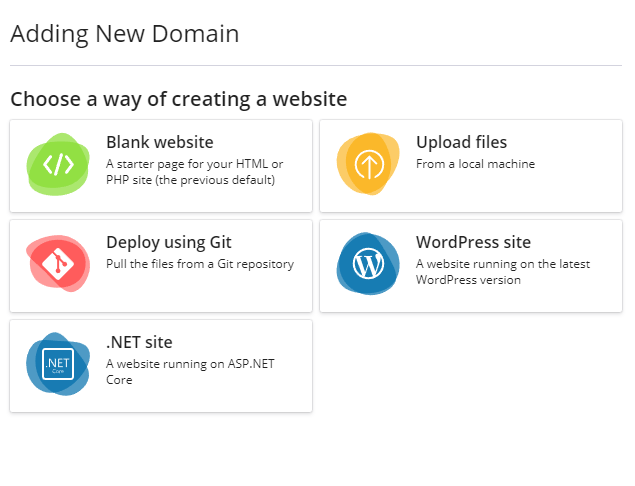
After updating Plesk to the latest version we need to add the domain for our WordPress website. Go to Websites & Domains, click on Add Domain and then choose WordPress site.
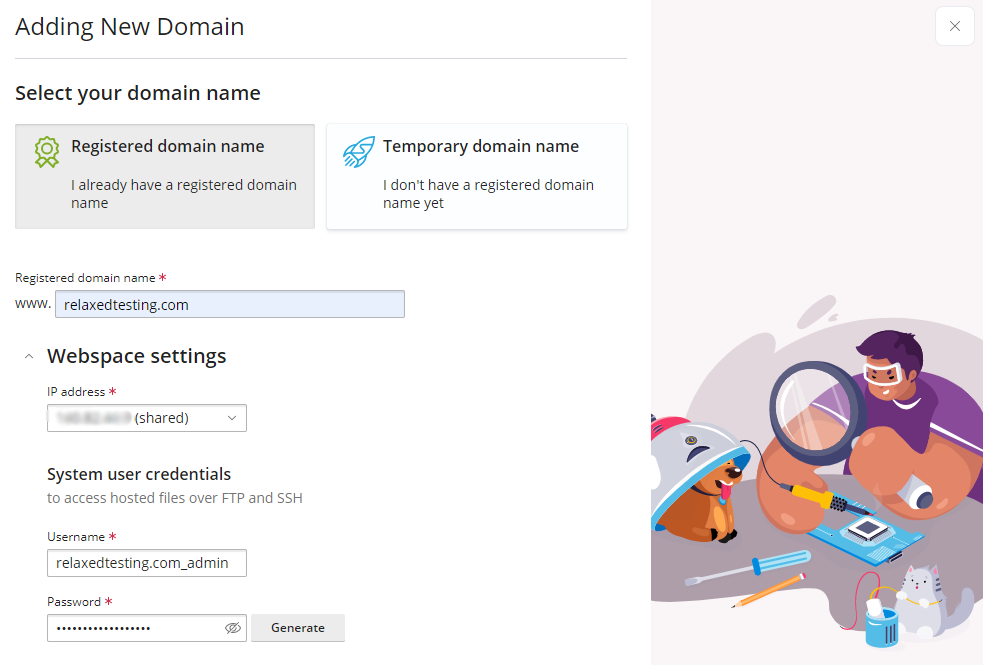
In the second step of the wizard, we will configure the domain that we will use. We will set up the system user credentials to access hosted files over FTP and SSH.
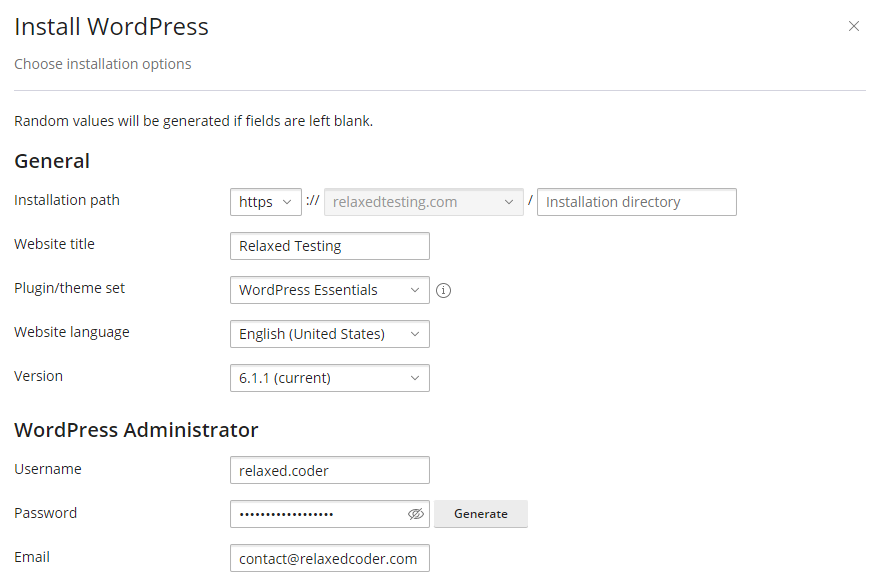
In the third step, we will need to set up WordPress. The first section covers some general settings. Here we can configure things like the title of our website, the WP theme to use, and the username and password for the WordPress administrator.
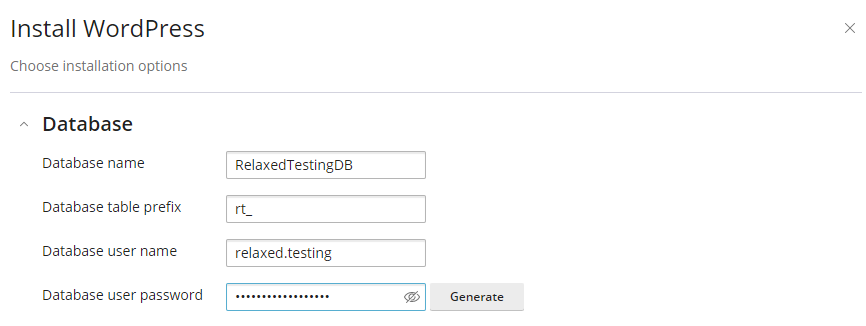
In the second section of the WordPress installation, we have the possibility to configure the database used by our website.
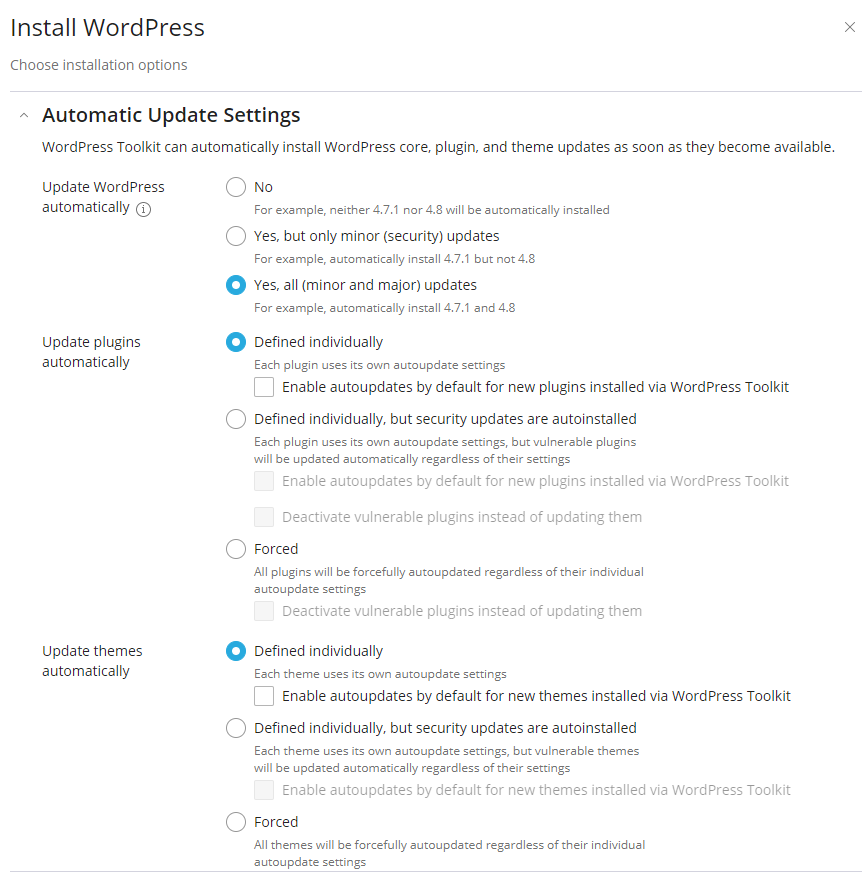
In the last section, we configure automated update settings. Set automated update settings based on your needs.
The installation wizard creates the website and the domain. We can preview the newly created WordPress website by accessing the preview URL. The URL should look something like this: http://[IP Address]/plesk-site-preview/relaxedtesting.com/https/[IP Address]/
DNS Settings
So far we can access our WordPress website by using the IP Address. In order for us to use the domain name we need to configure DNS. For this, we have two options. One option is to host the DNS on our Plesk server and the other option is to host it with other providers. In our example, I will use Namecheap , the provider where I bought my domain.
Hosting DNS on Plesk
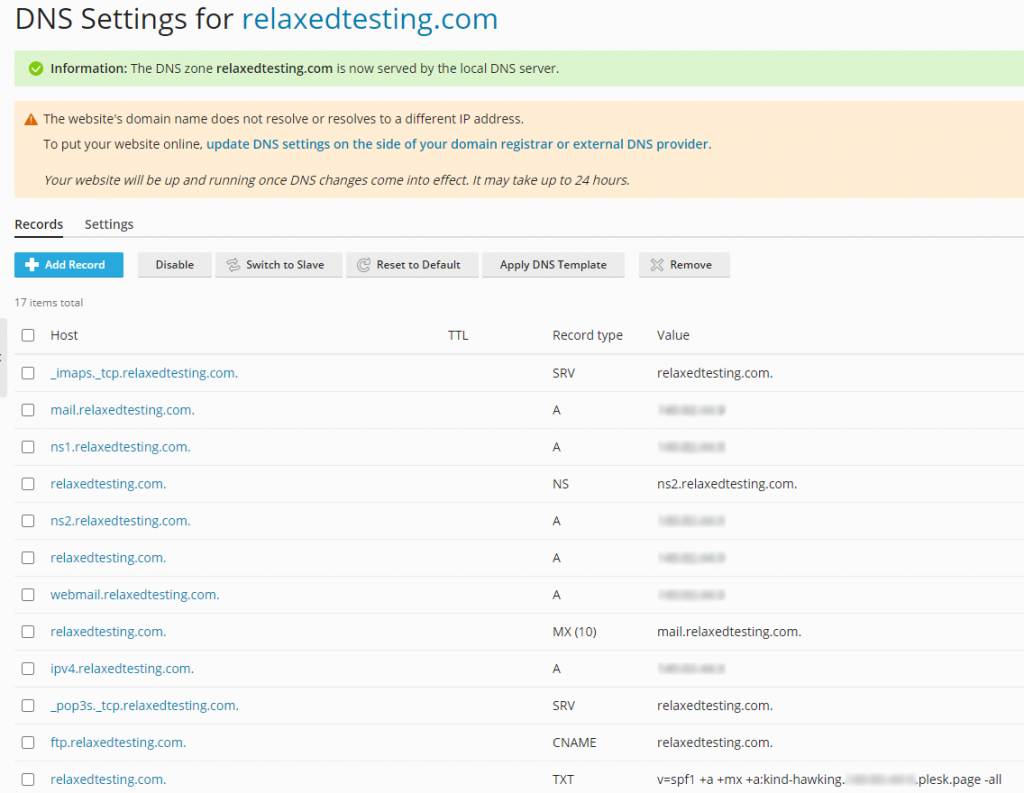
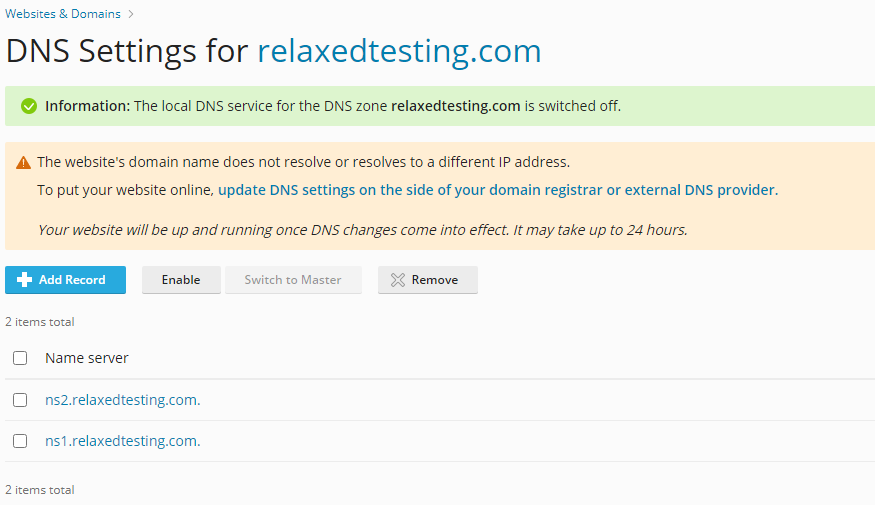
Go to Websites & Domains / choose the domain / Hosting & DNS / DNS Settings. Make sure that the local DNS service for your domain is enabled. The DNS settings were automatically created when we added the website and domain and should look something like this:
Click on “update DNS settings on the side of your domain registrar or external DNS provider”. Plesk will provide you with the information you need to update the DNS with your registrar. Here you will also find detailed instructions on how to update DNS based on your registrar.
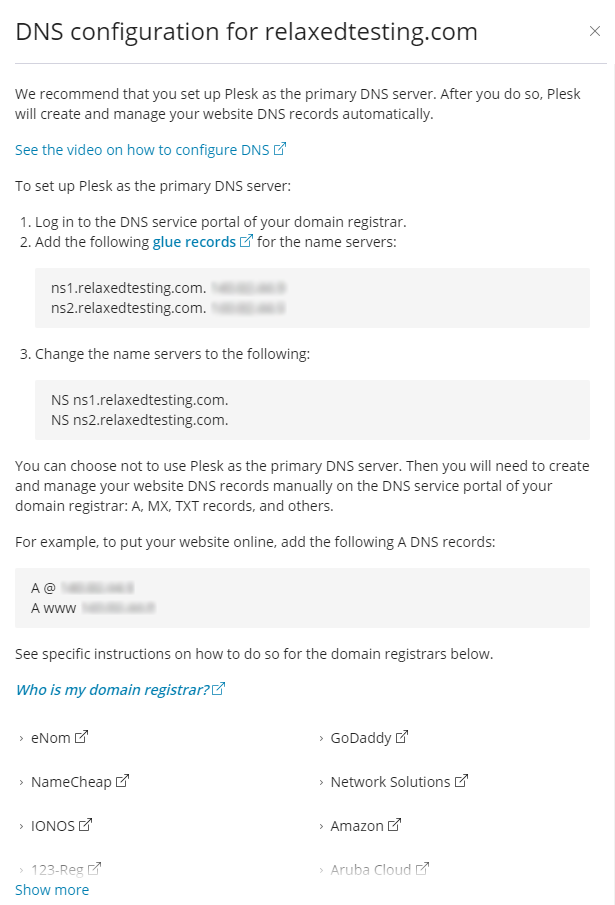
In my case, I am using Namecheap , for this, I just followed the instructions from Plesk, you can find them here.
Hosting DNS on Namecheap
If you opt to host your DNS records with another provider, you will need to disable the local DNS from Plesk.
From here on, you need to configure the DNS Records with your current provider. In my case, I will continue with configuring DNS Records on Namecheap .
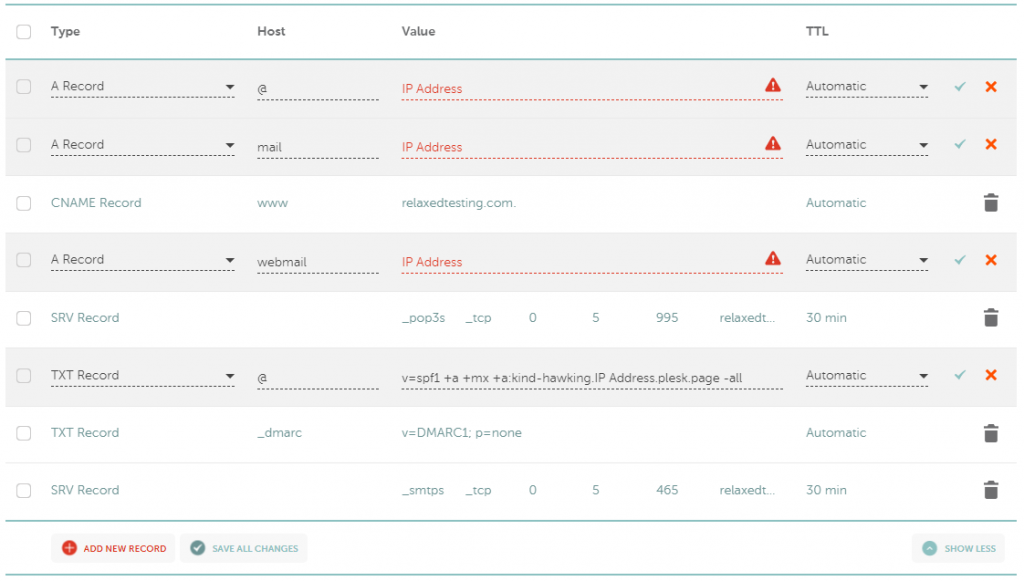
You have two options to manage DNS with Namecheap. Free DNS – keep your online presence. FreeDNS hosting makes sure your domain is visible to the Internet, and with secondary DNS backup avoids any gaps in your website’s availability. The second option is Premium DNS – this service will always be on duty, easily able to monitor and intuitively secure DNS hosting on your behalf. Get DNS Security Extensions (DNSSEC) support to combat DNS attacks, super-fast DNS speeds with global Anycast servers handling the busiest of websites and your queries, and your website 100% available — for one hugely affordable price–per–year. Forget about lost connections and data leaks. Advanced DNS security with PremiumDNS has you covered. Don’t worry about the price of Premium DNS, at the moment is under $5/yr.Go to your Namecheap account, choose to manage the domain you want to configure, and then Advanced DNS. Here we will configure the DNS Records that will resolve our domain and also the email for it. You should have something like below. Just add your IP address and replace relaxedtesting.com with your actual domain.
From here on you will be able to access your brand-new WordPress website using your domain name. Just bare in mind that it might take some time until the DNS will propagate. For checking the propagation status you can use tools like DNS Checker .
SSL Certificate
At this point, we have the WordPress website up and running but we cannot access it from HTTPS. Not serving the website via HTTPS exposes it to some security issues. For configuring the SSL/TLS we have two options. Use Let’s Encrypt or import an SSL Certificate from an outside provider.
SSL with Let’s Encrypt
In Plesk, go to your website, and under Security click on SSL/TLS Certificates. Under More Options choose to Install a free basic certificate provided by Let’s Encrypt.
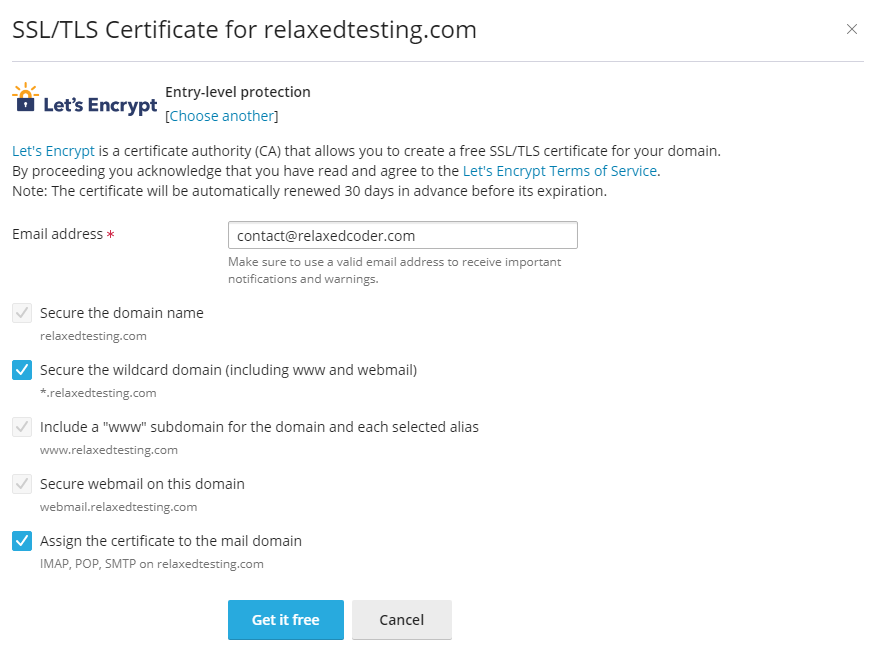
Click on Get it free.
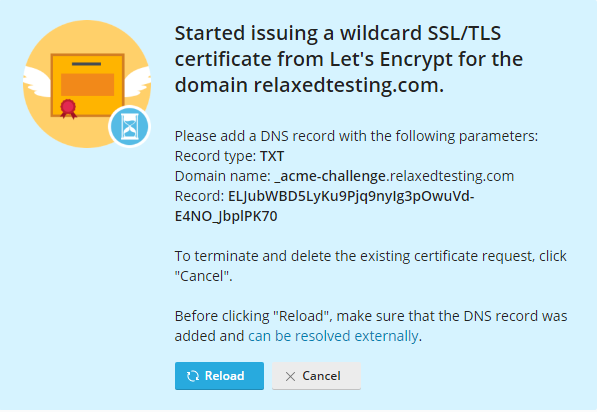
Here we are configuring a TXT DNS record. Based on what you have chosen in the DNS configuration section, configure the TXT record with the value provided above.
After configuring the TXT Record with your DNS provider, click on Reload. Bear in mind that in some cases the propagation can take some time, and clicking Reload might end-up showing you an error. In this case, restart the process and issue another Let’s Encrypt Certificate but wait a few minutes or an hour before clicking the Reload button.
SSL with SSLs.com
SSLs .com is for everyone, whatever the size and scope of the project. From small business websites to niche blogs run by tiny teams or individuals with a small budget, they got you covered. You don’t need to worry about spending a fortune or facing a steep technical learning curve. So you can focus on making your vision a reality, safe in the knowledge that your site is safe and secure. You can find SSL certificates on SSLs .com for less than $4/yr.
Before installing the SSL we will generate the SSL certificate. Go to Certs, choose the plan that best fits you, and then go through the configuration process. The main steps consist of
- Request and activate the certificate
- Validate the domain where you will use the certificate
- Download the SSL Certificate
Now that we have downloaded the SSL Certificate we can go ahead and install it in Plesk
- Go to your website and under Security click on SSL/TLS Certificates.
- Click Manage under Download or remove existing certificates section.
- Click on Add SSL/TLS Certificate, and provide a name for your certificate.
- Provide the Private key (*.key) – downloaded from SSLs .com during the SSL creation process. This key is a .txt file, change the extension to .key before uploading.
- Provide the Certificate (*.crt) – same as above, you can download it from SSLs .com.
- Click on Upload Certificate
- Download the certificate you just created as *.pem
- Go back to your website and under Security click on SSL/TLS Certificates.
- Click on the Upload .pem file under Upload a certificate you already purchased section
- The website is now secure with SSL. The certificate secures all domains and subdomains you choose in SSLs .com.
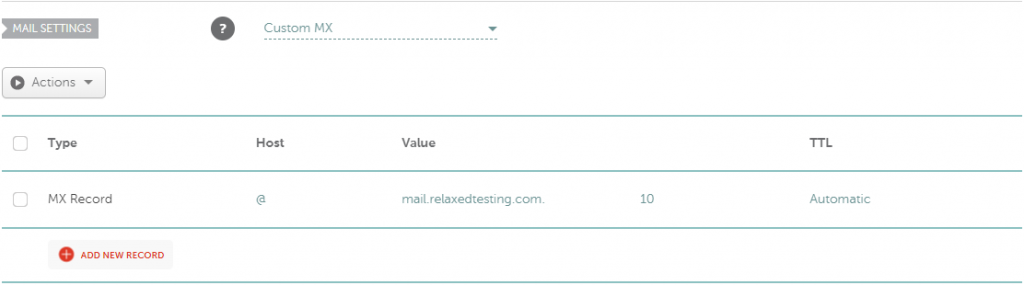
Before configuring the email, we need to make sure that the DNS settings are in place. When we configured the DNS for our website we added most of the records. We haven’t configured the MX record, this is how it’s configured with Namecheap :
With Plesk, we can configure everything we need for email services. Let’s see the steps to enable email for our domain:
- Click on Mail Accounts under Websites & Domains / Mail
- Choose to Create an Email Address
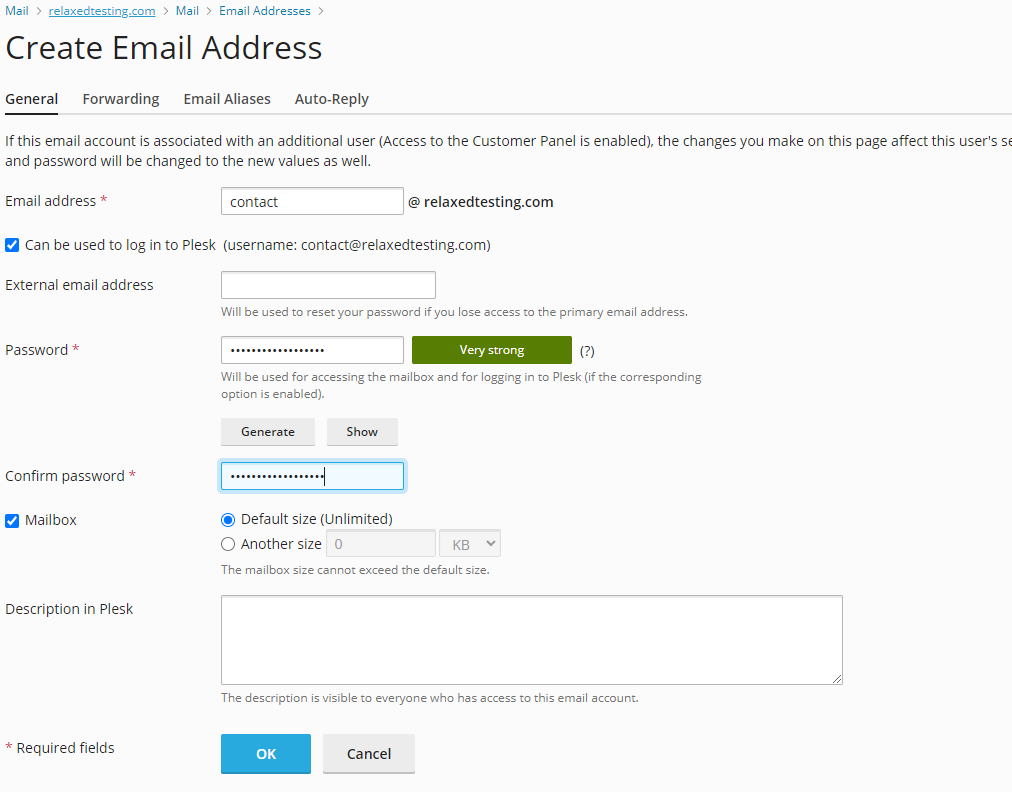
- Go to webmail.yourdomain.com to log in and manage your emails
If you go to Website & Domains / Your domain / Mail / Mail Settings you will notice a message saying “You cannot send emails from Plesk because outbound connections on TCP port 25 is blocked”. By default, Vultr is blocking some ports, including port 25 which we use for sending emails. To open port 25 you will need to contact Vultr and send them a ticket requesting this. You can find more details about the blocked ports here .
Cloudflare CDN
If you want your website to be globally accessible and provide high speed to all your visitors, regardless of their location, you will need a Content Delivery Network (CDN). A content delivery network, or content distribution network (CDN), is a geographically distributed network of proxy servers and their data centers. The goal is to provide high availability and performance by distributing the service spatially relative to end users.
Don’t want to invest any money into CDN? Cloudflare is offering a free version. Go to Cloudflare, choose the plan you want to use, and create your account.
Steps to configure CND with Cloudflare:
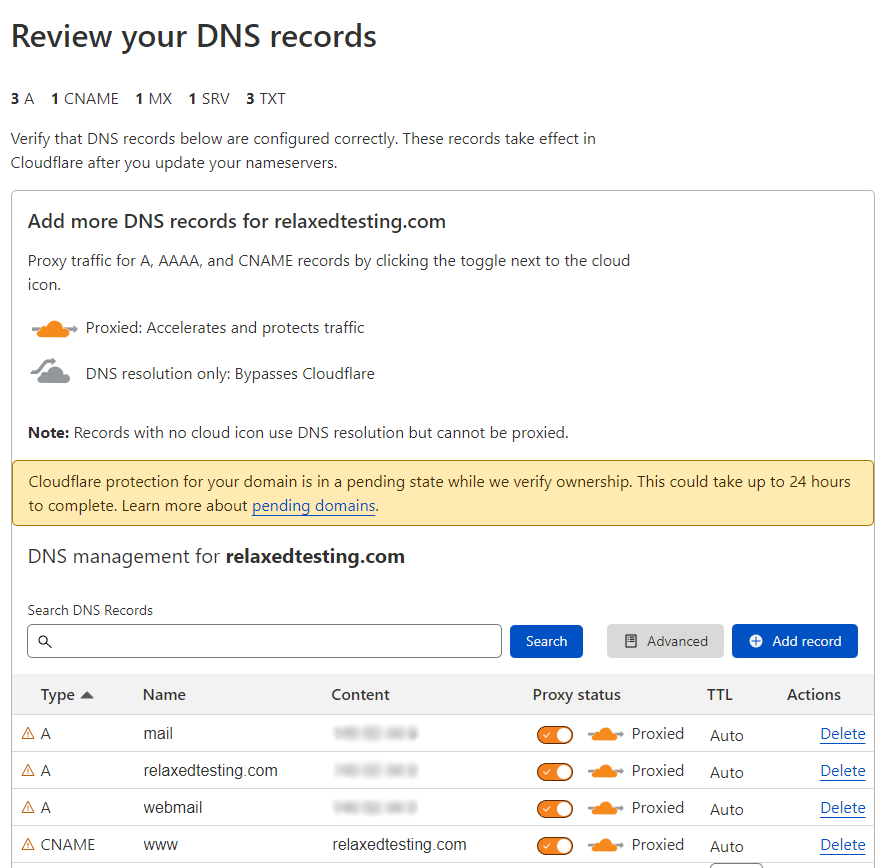
- From your dashboard go to Websites / Add Site / Enter the domain / Click on Add Site
- Review your DNS records and click Continue
- Change your nameservers
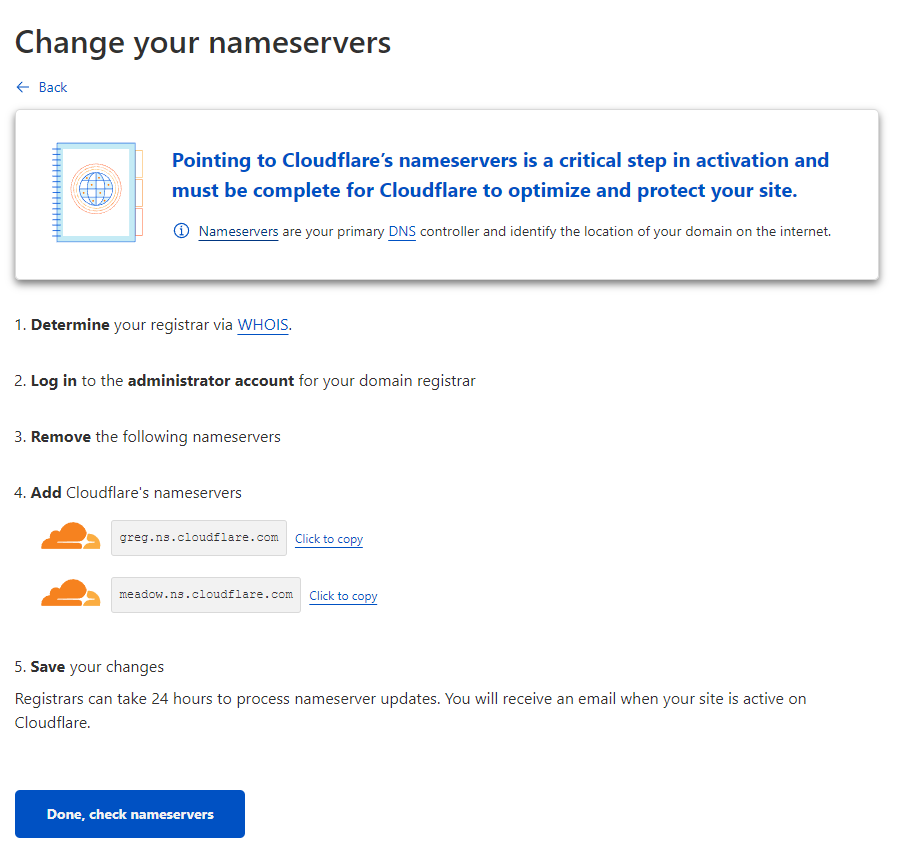
- Follow the steps from above and change the nameservers with your registrar. In my case, I am managing the nameservers with Namecheap
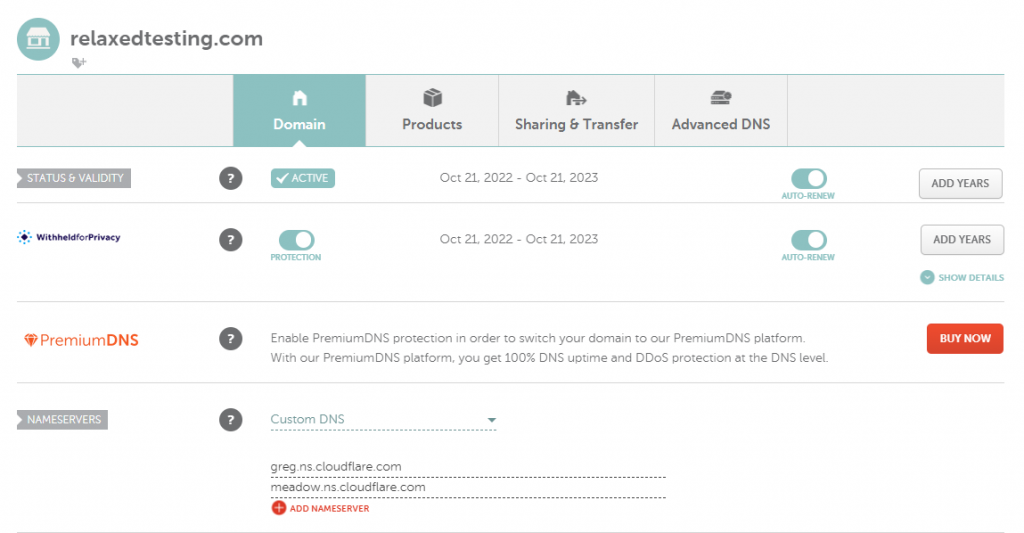
- Click Done, check nameservers
- Disable HTTPS redirect from Plesk: Website & Domains / SSL/TLS Certificates / Disable Redirect from HTTP to HTTPS
- Proceed with Cloudflare Start Guide
- Create a Cloudflare rule for WP-Admin, just follow this tutorial from Cloudflare. If you chose to use SSLs .com for your SSL Certificate, you will need to upgrade Cloudflare to Business Plan and upload your own certificate.
If you receive a “too many redirects” error when accessing WP-Admin, go to Cloudflare SSL/TLS / Overview / Choose Full (strict).
Security
Regardless if you choose to use Cloudflare or not, there are a few things we can do to improve the security of our website. With Vultr you can configure to use DDOS Protection and enable backups for restoring in case something goes wrong. Another good option is to enable the firewall for your Vultr server.
Use Plesk advisor to enable different features to increase Security, Performance, SEO, Update, and Backup. You can find the Advisor under Extensions or in the top right corner of Plesk.
One more important thing you should do is install a WordPress plugin that changes the wp-admin URL. You can use the All-In-One Security (AIOS) – Security and Firewall plugin to help you with different WordPress security settings that will help a lot in the long run. AIOS will also allow setting up 2FA, I consider this to be required for the security of the WP blog/website.
Video Tutorial
Subscribe to my newsletter
Subscribe to Relaxed Coder and be up to date with the latest articles.
Conclusions
We learned how to deploy a VPS with Vultr , a great alternative to WordPress shared hosting. We saw that we can configure everything we find with WordPress shared hosting providers. Deploying WordPress on a VPS comes with a lot of advantages, the most important being that we get great performance increases at a better price. This makes WordPress VPS hosting ideal for larger websites. If you liked this post or if you have any questions please use the comments section below.

No comments yet.