How to use Conditional Statements in C#
In this post, we will cover the conditional statements in C#. We will talk about conditional operators and logical operators. Afterward, we will find out about if-else statements, nested if-else, sequences of if-else, and switch-case statements. In the end, I will provide you with some best practices when using conditional statements in C#.
Let’s see if I can get you into a more relaxed mood before we start. Maybe a joke about using the if statement will help. I have used this joke before but it feels too connected to conditional statements :).
The programmer’s spouse asks the programmer to go to the store.
Spouse says, “Get a loaf of bread, if they have eggs, get a dozen.”
The programmer comes home with a dozen loaves of bread and says, “They had eggs.”
What are conditional statements?
Conditional statements execute different actions depending on a given condition.
Comparison Operators
C# comparison operators compare two or more variables. C# supports the following comparison operators:
- greater than (>)
- less than (<)
- greater than or equal to (>=)
- less than or equal to (<=)
- equality (==)
- difference (!=)
Logical Operators
The C# logical operators take Boolean values and return a Boolean result (true or false). The basic Boolean operators are “AND” (&&), “OR” (||), “exclusive OR” (^), and logical negation (!).
The C# logical operator “AND” (&&) returns true only when both variables are true. The logical operator “OR” (||) returns true when one of the variables is true. The C# logical negation operator (!) changes the value of the variable. If the variable is true, after applying the negation operator to our variable, the result will be false.
##C# if statement
If and if-else are conditional statements that allow the program to behave differently based on a defined condition checked during the execution of the statement.
An if statement looks like this:
if (boolean expression)
{
    // body of if statement
}
The boolean expression can be a boolean variable or a boolean logical expression.
Curly brackets delimit the body of the statement. The body of the if statement can contain one or more operations. When we have only one operation in the body of the if statement we can omit the curly brackets. For a cleaner and easy-to-read code, always use curly brackets to delimit the body of the if statement, even when we have one operation.
C# if else
The if statement can be used together with the else clause.
If-else statement looks like this:
if (boolean expression)
{
    // body of if statement
}
else
{
    // body of else statement
}
As in the case of the if statement, the body of the else statement is delimited by curly brackets () and it can contain one or more operations. How if-else works is straightforward. When the expression from the if statement is true, the body of the if statement is executed. In this case, the body of the else statement is omitted. When the expression from the if statement is false, the body of the else statement is executed. In this case, the body of the if statement is omitted.
Nested if
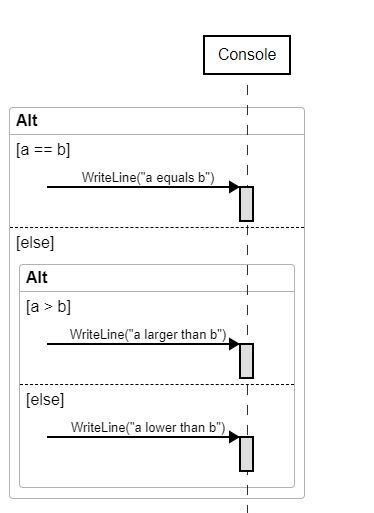
Sometimes if-else is not covering all the cases and so, nested if is there to help. We call nested if or if-else when we have if or if-else inside the body of an if or an else statement. When we have multiple nested levels we should look towards refactoring to achieve a cleaner and easier-to-read code. Here is an example of a nested if-else statement:
var a = 4;
var b = 5;
if (a == b)
{
    Console.WriteLine("a equals b");
}
else
{
    if (a > b)
    {
        Console.WriteLine("a larger than b");
    }
    else
    {
        Console.WriteLine("a lower than b");
    }
}
I like associating code with images in some cases, this will help you as well. Here is a sequence diagram representing if-else statements from above.
Sequences of if else
Sometimes we need to use a sequence of if conditions that have the else clause as an if statement. When needed, try replacing the if-else sequence with the switch-case statement. More about the C# switch-case statement is below. Before that, here is an example of sequences of if-else in C#:
var animal = Console.ReadLine();
if (animal == "snake")
{
    Console.WriteLine("The animal is a snake");
}
else if (animal == "wolf")
{
    Console.WriteLine("The animal is a wolf");
}
else if (animal == "bear")
{
    Console.WriteLine("The animal is a bear");
}
else if (animal == "elk")
{
    Console.WriteLine("The animal is a elk");
}
else
{
    Console.WriteLine($"Could not find the animal {animal}");
}
Once again, I will provide the switch-case sequence diagram for the code above.
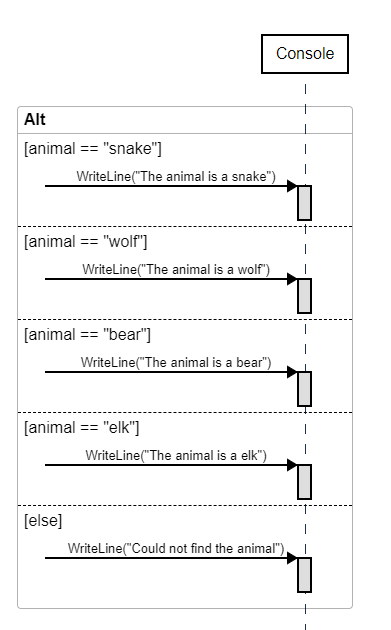
If you want to turn your code into visual sequence diagrams, here is a website that will help you achieve that app.zenuml.com .
Switch-case statement
I mentioned before we can replace the if-else sequence with the switch-case statement. This statement starts with a switch operator. This compares the result of the selector to every value listed in the case labels in the body of the switch structure. Whenever a match is found in a case label, the corresponding case body is executed. If no match is found between the case labels, the default statement is executed. The body of the case label and of the default statement can contain one line or more lines. At the end of each case body and at the end of the default body we have a “break” operator. This is required for each case body, except in the case when we have no code after the case statement. If we have no break operator, the switch-case statement will continue until it hits a “break” operator.
So far we’ve found out what a switch-case is and what it is composed of. Now let’s see how our sequences of if-else from above refactor into a switch-case statement.
var animal = Console.ReadLine();
switch (animal)
{
    case "snake":
        {
            Console.WriteLine("The animal is a snake");
            break;
        }
    case "wolf":
        {
            Console.WriteLine("The animal is a wolf");
            break;
        }
    case "bear":
        {
            Console.WriteLine("The animal is a bear");
            break;
        }
    case "elk":
        {
            Console.WriteLine("The animal is a elk");
            break;
        }
    default:
        {
            Console.WriteLine($"Could not find the animal {animal}");
            break;
        }
}
Good practices
Here are some good practices when it comes to conditional statements:
- To read the switch-case statement easier, try putting the default statement at the end.
- For ease of reading, in the switch-case statement put the cases that occur more often first and the ones that occur on rarest occasions put at the end.
- If the values of the case statement are numbers or strings, try to order the ascending for numbers and alphabetically for strings.
- It is recommended to always use default in the switch-case statement. You should always handle cases that are not reached in the case statements.
- Always use curly brackets to clearly define the body of the if or else statements.
- Use text indentation inside the body of the conditional statements to increase readability and avoid ambiguity.
- Favor switch-case statements instead of if-else sequences or nested if-else statements.
That’s it for now, as always please use the comments section below if you have any questions or want to say hi. Until next time, relax and code on!

No comments yet.